Gone!! Congrats Kelly, your book will be on it’s way to you tomorrow.
Next up…..
Ha ha ha ha, keep an eye here, there are more giveaways coming…..
Free Patterns, Tutorials and Project Ideas
Gone!! Congrats Kelly, your book will be on it’s way to you tomorrow.
Next up…..
Ha ha ha ha, keep an eye here, there are more giveaways coming…..
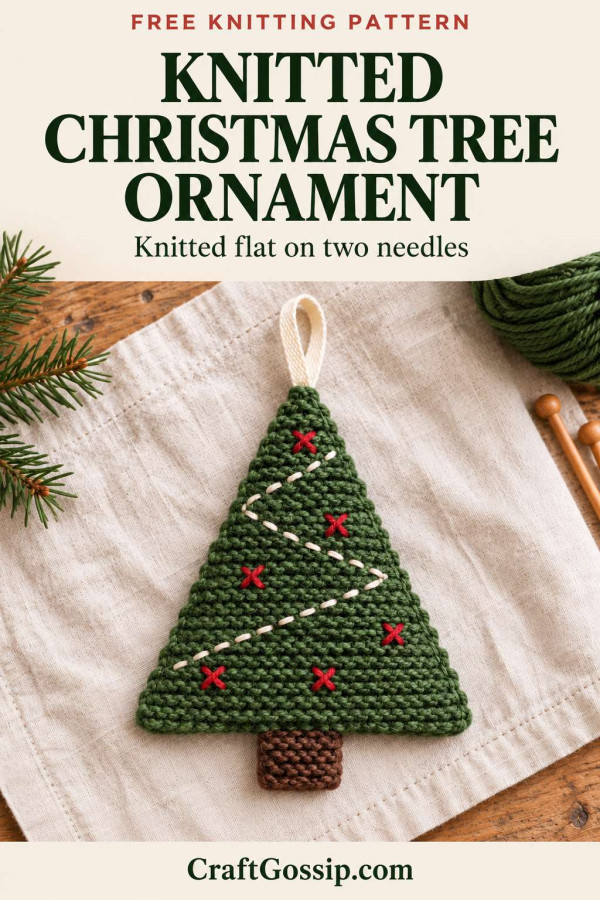
There’s something rather lovely about unpacking handmade Christmas decorations each year. They might be a little wonky, and someone has usually tangled the hanging loops, but they’re always the ones I want at the front of the tree.
This free Christmas tree bauble knitting pattern makes a softly stuffed, tree shaped ornament with a little brown trunk and embroidered decorations. It’s worked flat on two needles in garter stitch, so there’s no knitting in the round or juggling double-pointed needles.
You’ll knit two matching triangles, add a small trunk, then sew everything together. It’s a useful project for those leftover balls of green yarn that are too small for much else but apparently too precious to throw away.
Finished measurements are estimates and will vary with your yarn, tension and seam allowance.
Choose smooth yarn so you can see the stitches easily. Smaller needles than you might normally use with DK yarn help create a firm fabric that keeps the stuffing tucked inside.
Approximately 24 stitches and 44 rows to 10 cm in garter stitch, measured flat without stretching.
Garter stitch means knitting every row. Two knitted rows form one garter ridge.
Exact tension is not essential for a decoration, but the fabric should be firm enough that stuffing does not show through. If your knitting looks loose, try smaller needles.
Each tree panel begins at the wide bottom edge and narrows towards the tip.
Most shaping rows decrease two stitches, one near each edge. Three plain knit rows separate these shaping rows. The final decrease turns three stitches into one to finish the point.
Keep your cast-on edge relaxed. A tight cast-on can pull the bottom of the tree into a curve.
Make two identical panels in green.
Cast on 25 stitches, leaving a 40 cm tail for sewing.
Rows 1–3: Knit all stitches. 25 sts
Row 4: K1, SSK, knit to the last 3 stitches, K2tog, K1. 23 sts
Rows 5–7: Knit all stitches.
Row 8: K1, SSK, knit to the last 3 stitches, K2tog, K1. 21 sts
Rows 9–11: Knit all stitches.
Row 12: K1, SSK, knit to the last 3 stitches, K2tog, K1. 19 sts
Rows 13–15: Knit all stitches.
Row 16: K1, SSK, knit to the last 3 stitches, K2tog, K1. 17 sts
Rows 17–19: Knit all stitches.
Row 20: K1, SSK, knit to the last 3 stitches, K2tog, K1. 15 sts
Rows 21–23: Knit all stitches.
Row 24: K1, SSK, knit to the last 3 stitches, K2tog, K1. 13 sts
Rows 25–27: Knit all stitches.
Row 28: K1, SSK, knit to the last 3 stitches, K2tog, K1. 11 sts
Rows 29–31: Knit all stitches.
Row 32: K1, SSK, knit to the last 3 stitches, K2tog, K1. 9 sts
Rows 33–35: Knit all stitches.
Row 36: K1, SSK, knit to the last 3 stitches, K2tog, K1. 7 sts
Rows 37–39: Knit all stitches.
Row 40: K1, SSK, knit to the last 3 stitches, K2tog, K1. 5 sts
Rows 41–43: Knit all stitches.
Row 44: K1, slip the next stitch knitwise, K2tog, then pass the slipped stitch over the stitch just worked, K1. 3 sts
Rows 45–47: Knit all stitches.
Row 48: Slip the first stitch knitwise, K2tog, then pass the slipped stitch over the stitch just worked. 1 st
Cut the yarn, leaving a 25 cm tail. Draw the tail through the remaining stitch and pull gently to secure.
Repeat for the second panel.
After each shaping row, your counts should be:
23, 21, 19, 17, 15, 13, 11, 9, 7, 5, 3, 1.
If your count is wrong, correct it before continuing. A small ornament is considerably less forgiving than a roomy scarf.
Make one in brown.
Cast on 5 stitches, leaving a 20 cm tail.
Rows 1–16: Knit all stitches.
Cast off, leaving another 20 cm tail.
Fold the strip in half so the cast-on and cast-off edges meet. This creates a double-layer trunk approximately 2 cm wide and 2 cm tall.
Sew the two side edges together. Leave the paired cast-on and cast-off edges available for attaching inside the tree.
The trunk does not need stuffing.
Decorate one tree panel before sewing the ornament together. Choose whichever face you prefer as the front.
Using red yarn, make five or six small cross stitches scattered over the panel.
For each bauble:
Keep the embroidery approximately 1 cm away from the edges so it stays clear of the seams.
Use cream or gold yarn to embroider a loose zigzag across the tree with short running stitches.
Avoid carrying one long, tight strand across the back. Leave a little slack between stitches so the panel stays flat.
You can decorate both panels if you want the ornament to look festive from either side.
Weave in any embroidery ends.
If the panels need tidying, lightly dampen them, gently arrange them into matching triangles and allow them to dry flat. Follow the care instructions for your yarn.
Place the back panel on the table with its outside facing down.
Centre the folded brown trunk along the bottom edge. Position its open edges approximately 5 mm inside the green panel, with the folded end extending below the tree.
Sew the open trunk edges securely to the inside of the back panel.
Fold the ribbon or strong yarn in half.
Place both cut ends inside the tip of the tree, overlapping the green fabric by approximately 2 cm. Leave a loop extending above the point.
Sew the ends securely to the inside of the back panel with several small stitches. Check that the stitches do not show prominently on the outside.
Place the front panel over the back panel, with the decorated faces pointing outwards.
Using green yarn, oversew through matching edge stitches:
Use small stitches and avoid pulling the seam tight enough to gather the edges.
With the bottom edge still open, insert small wisps of stuffing.
Use the blunt end of your yarn needle to ease a little stuffing towards the tip. Add enough to give the tree a softly padded shape while keeping the outline flat.
Overstuffing will make the panels bulge and can reveal gaps between the stitches.
Sew across the bottom edge, catching both green panels and securing the trunk where it emerges.
Weave the yarn ends through the inside of the ornament, trim them and gently pat the stuffing into an even shape.
Give the hanging loop a gentle tug to check that it is securely attached.
For striped panels, carry the unused yarn loosely up the side and enclose it in the seam.
Check that both have 48 rows and that you used the same needles. Make sure you have counted rows rather than garter ridges.
Light blocking can help with a small difference. A substantial difference usually means one panel has extra rows or a different tension.
Remove some stuffing first. If the fabric itself is too open, use smaller needles for the next ornament.
Use less stuffing and gently redistribute it towards the corners. This design should resemble a lightly padded triangle.
Your cast-on or sewing may be too tight. Loosen the bottom seam if necessary. For the next panel, cast on more loosely.
If you’re making a collection of handmade decorations, these knitted mini mitten ornaments would make a sweet companion. For a different shape, take a look at these fancy knitted Christmas baubles.
Your finished tree also makes a lovely reusable gift topper. Thread the loop through the ribbon on a wrapped present, and the recipient gets a little decoration to keep after the paper has disappeared.