• Home
  • Suggest A DIY
  • DIY Newsletter

Knitting

Free Patterns, Tutorials and Project Ideas

  • About CraftGossip
  • Our Network
    • Bath & Body Crafts
    • Candle Making Ideas
    • Crochet Ideas
    • Cross Stitch
    • Edible Crafts
    • Felting Patterns
    • Glass Art
    • Home & Garden Ideas
    • Indie Crafts
    • Jewelry Making
    • Kids Crafts
    • Knitting Patterns
    • Lesson Plans
    • Needlework
    • Party Ideas
    • Polymer Clay
    • Quilting Ideas
    • Recycled Crafts
    • Scrapbooking
    • Sewing Patterns
    • Card Making
    • DIY Weddings
    • Not Craft Ideas
  • Giveaways
  • Roundups
  • Store
  • Search

A Trick to Make Seaming Shoulders Easier

October 14, 2014 by Sarah White

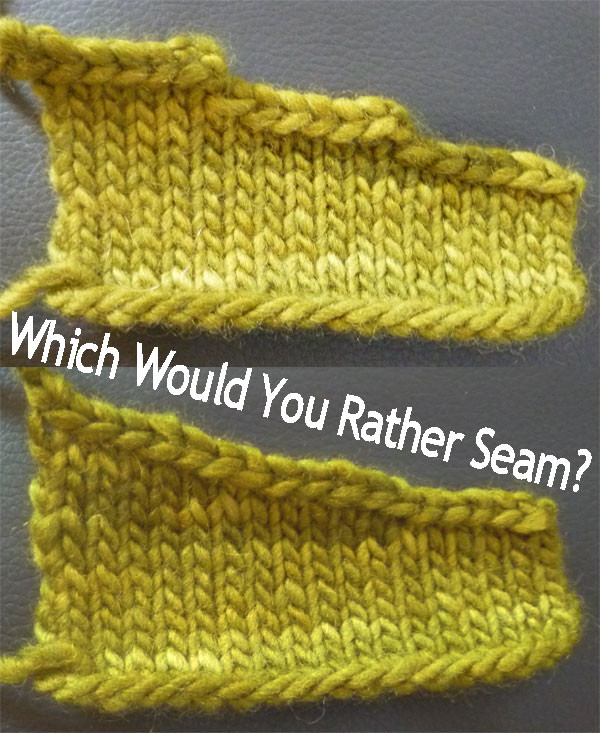
How to use short rows to shape a shoulder.One of the disadvantages of knitting a pieced sweater is all the finishing that’s involved, and one of the most unpleasant duties when it comes to finishing a sweater is sewing in the sleeves.

One of the things that often causes problems when it comes to setting in sleeves is the stairstep nature of many sleeve designs. That shaping is there, as Gwen from 2 Sides 2 Points tells us, so that the shoulder seam will form a straight line from the neck along the shoulder. (Note, this article is now available through the Internet Archive, which might not always be the case.)

This is usually accomplished by making a stairstep bind off, which looks in the pattern like “BO x stitches at the beginning of next Y rows.” It’s easy to write a pattern that way, and it’s easy for the knitter to execute, but it’s not the best when it comes to seaming.  Looking for sweater patterns? Check these books out.

As is so often the case in knitting, the answer is short rows. Check out the article linked above for more on why short row shoulders are so great and how to convert a pattern written for stairstep shoulders into a short row shoulder.

It’s a really clever idea that will make seaming that much easier. (And if you’ve never worked short rows before, check out my tutorial at the Spruce. Disclaimer: I wrote this when it was still About, and haven’t worked there for years and am not responsible for edits or deletions.)

Have you ever done a short row shoulder? I’d love to hear about it!

Did you know, specific to knitters, you can join our Knitting Patterns Only group to get knitting patterns, ask questions and gain inspiration for what to knit next. Or how about our VIP Knitting Group with Free knitting pattern access including vintage and Etsy designer patterns for less than $1 a month.

[Photo via 2 Sides 2 Points.]

Check out our New DIY Crafty Creative T-shirts featuring Knitting and Yarn Designs.
«
»

Comments

  1. Marlene says

    December 29, 2017 at 10:34 pm

    I always do German short row shaping on my shoulders, but I don’t bind them off and sew them together. I hold the stitches until the corresponding shoulder is finished, then I bind off both shoulders together using the three needke bind off method. It makes a very flat seam with a little, but not too much, stretch.

  2. Sooz says

    August 24, 2018 at 7:50 pm

    Did I miss something? Where is the instruction on this?

  3. Sarah White says

    August 26, 2018 at 4:26 pm

    That page doesn’t seem to exist anymore, but here’s another page that talks about short-row shoulder shaping. https://www.sistermountain.com/blog/short-row-shoulders

  4. Karen Richardson says

    March 12, 2020 at 4:56 am

    How do you do german short rows for a kite shaped scarf ?

  5. P says

    September 21, 2020 at 10:16 pm

    I do my shoulders the same Marlene does. German Short Row shaping and connecting back to front with a 3-needle bindoff. So neat and clean and no bothersome seaming.

  6. Christine says

    April 24, 2021 at 7:24 am

    I do mine the same as Marlene, a whole lot less bother

Have you read?

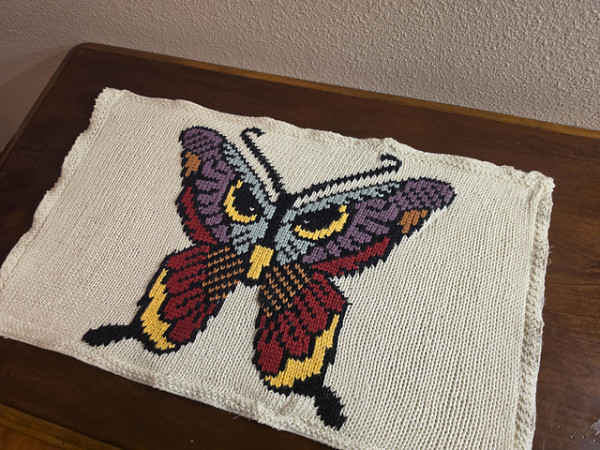
Stitch a Play Mat with a Gorgeous Butterfly

The butterfly on this piece — the Owl Butterfly Playmat by Sophie’s Stitches — caught my eye before I even knew what the project was. Now that I’ve give it a closer look I’m still not 100 percent sure what it is meant to be for, but I still love it. 

I think it’s maybe to give you a flat surface to roll dice or play cards on, but there are no images of the project in use so I’m just speculating on that. If you know what it is, be sure to let me know!

What it physically is is a worsted weight mat (the sample is worked in cotton) that measures 14 by 24 inches, or 35.5 by 61 cm. The impression I get from the pattern notes and the photos is that you knit the rectangle plain and the butterfly is stitched on after using duplicate stitch, which is provided as a chart. 

Of course you could choose to knit some of the colorwork as you go, either using stranded knitting or intarsia techniques, or maybe some of both. It just looks like a lot of duplicate stitch (and it is!) so knowing me if I were making this project I’d probably try to knit some of it instead of stitching it all. 

The pattern also suggests that you can knit a second plain mat to sew on the back and cover up all the yarn ends, as well as making the mat thicker and a little more stable. There’s also a photo that shows fabric sewn to the back, which is also a good option if you have some fabric that has a bit of grip. 

I like the graphic on this one enough I might just make it as a table pad for our entry way table. You can always make the mat part a different dimension, just make sure you’re centering the image if you do. 

You can find this pattern on Ravelry. 

[Photo: Sophie’s Stitches]

Categories

Afghans, Blankets, Throws baby hat Baby Patterns Beginner Book Reviews cardigans Christmas Craft News and Events Free Knitting Patterns Giveaways! Hats and Beanies Knit Knitting Patterns Knitting Technique & Tutorials mittens Quick Knits scarf shawl patterns socks Sweaters

RSS feed: More Articles More Articles

  • Designer Spotlight: And Wabi Sabi
  • Stitch a Play Mat with a Gorgeous Butterfly
  • 20 Non-Candy Halloween Treat Ideas for Kids, Classrooms and Trick-or-Treaters
  • DIY Snowman Door Hanger Using Tulle and Fairy Lights
  • Whipped Manuka Honey Body Butter – Ultra-Rich DIY Moisturizer for Dry, Mature Skin
  • How to Wet Felt an Embellished Clutch Purse by Natasha Smart Textiles
  • 10 Cute Halloween Scrapbook Layout Ideas
  • Book Review: The Wandering Knitter
  • Book Review: Irresistibly Cute Mini Amigurumi – 62 Tiny Crochet Projects
  • 10 Easy Overnight Oats Recipes That Are Full of Flavour

Pick Your Blog

  • Sewing
  • Knitting
  • Quilting
  • Crochet
  • Home & Garden
  • Recycled Crafts
  • Scrapbooking
  • Card Making
  • Polymer Clay
  • Cross-Stitch
  • Edible Crafts
  • Felting
  • Glass Art
  • Indie Crafts
  • Kids Crafts
  • Jewelry Making
  • Lesson Plans
  • Needlework
  • Bath & Body
  • Party Ideas
  • Candle Making
  • DIY Weddings
  • Not Craft
  • Free Craft Projects

Copyright © 2026 · CraftGossip | Start Here | Contact Us | Link to Us | Your Editors | Privacy and affiliate policy