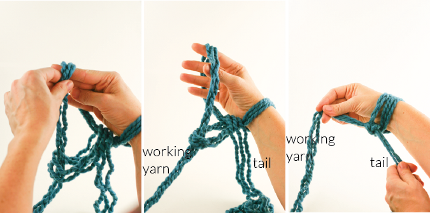
 The arm knitting tutorials just keep coming! (See previous roundups here and here.)
This one is a photo tutorial series from Flax & Twine, which starts with casting on, then moves on to knitting, binding off and finishing projects. As usual, these instructions show how to work a knit cowl.
I like this tutorial for all the pictures, and it also offers lots of different yarn suggestions to fit a range of budgets.
Have you gotten into arm knitting? I still haven’t tried it! I’d love to hear how it went for you if you have!
[Photo via Flax & Twine.]
Arm knitting is a knitting technique where you use your arms as the needles to knit a project. Instead of traditional knitting needles, you use super chunky yarn and your arms to create a cozy and unique knit piece. Here are 5 tips for arm knitting:
- Use thick yarn: When arm knitting, it’s important to use a thick yarn that can easily slide over your arms. Super chunky yarn works best for arm knitting projects.
- Make sure your yarn is smooth: Avoid using yarn that has knots or tangles as it can make arm knitting difficult and frustrating.
- Use a slip knot: Start your project with a slip knot to make it easier to get started and to keep your stitches tight.
- Keep your stitches loose: Because you are using your arms as needles, it can be easy to knit your stitches too tightly. Make sure to keep them loose so that you can easily slide the yarn over your arms.
- Take your time: Arm knitting is a bit different from traditional knitting, so take your time and don’t get discouraged if it takes you a bit longer to complete your project.
Simple Arm Knitting Scarf Pattern:
- Cast on 6 stitches using a slip knot
- Knit all stitches for 30 inches or desired length
- Bind off and weave in ends.
And there you have it, a cozy arm-knitted scarf! Remember to take your time, keep your stitches loose, and enjoy the process.
