• Home
  • Suggest A DIY
  • DIY Newsletter

Knitting

Free Patterns, Tutorials and Project Ideas

  • About CraftGossip
  • Our Network
    • Bath & Body Crafts
    • Candle Making Ideas
    • Crochet Ideas
    • Cross Stitch
    • Edible Crafts
    • Felting Patterns
    • Glass Art
    • Home & Garden Ideas
    • Indie Crafts
    • Jewelry Making
    • Kids Crafts
    • Knitting Patterns
    • Lesson Plans
    • Needlework
    • Party Ideas
    • Polymer Clay
    • Quilting Ideas
    • Recycled Crafts
    • Scrapbooking
    • Sewing Patterns
    • Card Making
    • DIY Weddings
    • Not Craft Ideas
  • Giveaways
  • Roundups
  • Store
  • Search

Free Patterns From Coats and Clark

July 10, 2009 by Terrye

sweater
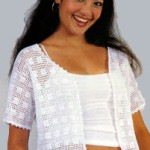
This adorable cardigan and many more, free from Coats and Clark, here:  http://www.purplekittyyarns.com/free-patterns/sweater-patterns.html

Looking for more knitting patterns for knitted Cardigans? Check out these Knitting patterns we found on Etsy.

Specific to knitters, you can join our Knitting Patterns Only group to get, well, knitting patterns, ask questions and gain inspiration for what to knit next.

Next Pattern:

  • Free Knitting Pattern - Mother And Child Tunic Set And Pants
  • Red, White and Blue Knitting Patterns for Fourth of…
  • Free and Easy Shamrock Knitting Patterns
«
»

Comments

  1. Norma Hammett says

    November 3, 2009 at 8:21 pm

    I am looking for a pattern for a cardigan sweate I made in the 60s. It used 3 skeins of yran and was made in one piece from the neck down. Can you help me, please

  2. Joyce Crawford says

    October 6, 2010 at 2:20 pm

    I too am looking for a knitting pattern. Child’s Jiffy Petal Cardigan B-487. It is worked from the neck down with no seams on the body. My instructions are wearing out as I have used it so often! It is a lovely sweater!

  3. Margaret Lloyd says

    October 11, 2010 at 1:49 pm

    I have been looking for a crochet pattern for a long time. It was put out by C&C in the 60’s. It is an afghan worked in white afghan stitch then embroidered in blue. The design was a chinese scene. It had three patterns and was absolutely delicious. I would appriciate any help.Thank you ahead of time.

  4. Margaret Lloyd says

    October 11, 2010 at 2:05 pm

    I am looking for a crocheted afghan pattern from the 60’s. It is a three panel afghan st. with embroidery in a chinese picture. I made 2 of them for my mother. I lost the original pattern in the fires of the 94 earthquake. I would like to make another

  5. Karene Sattler says

    December 22, 2010 at 9:58 am

    I am looking for a knitted fingerless glove pattern for a teenager. Using straight needles.

  6. Barb Enge says

    January 6, 2011 at 2:40 pm

    I am looking for a pattern for an infinity scarf. Either crochet or knit.

  7. Anne Misner says

    January 10, 2011 at 4:21 pm

    I am looking for childs jiffy petal cardigan sweater pattern. Can anyone help?

  8. Priscila K.B. Sanchez says

    January 26, 2011 at 11:39 am

    I am looking for a child dress pattern, Coats & Clark book # 191 pattern #B-697. Can anyone help? Thank You, have a wonderful day!

  9. diane mansfield says

    January 31, 2011 at 8:31 am

    I am looking for a Coats and Clark adult petal cardigan booklet no. 1968.

  10. Sharon says

    July 7, 2011 at 2:44 pm

    I am knitting Coats & Clark aran cardigan D-391. Instructions say “Rep rows 11-24 over 13 bobble section sts and rows 1-24 for all other sections”…. I am confused; do I repeat 1-24 or 11-24 (until 80 rows above ribbing)??

  11. Alice J says

    August 23, 2011 at 10:43 am

    I am looking for a pattern that I had back in the late 60’s or 70’s. The pattern was a little girl or toddler’s knit skirt . The skirt was knit straight with a fold over waist that elastic was inserted. In the front yarn was attached and knit on about 10 to 15 stitches to make a bib, and the corners at the top of bib were mitered. to finish. The 2 straps were knit and attached front and back. This skirt was knit from fine yarn. Thanks for any help you may provide Alice J.

  12. Pierrette Roberts says

    October 24, 2011 at 4:06 pm

    I have a patterns of your.
    Pearl Pullover LW1349**
    Tell me with is the instruction ( CrR &CrL Please Tell Me What this mines the term of knitting .
    I never see this explanation?????????????

    thanks you

  13. Linda Parnham says

    January 24, 2012 at 9:18 am

    I am looking for a ladies sweater pattern for Christmas. Something with a seasonal pattern.

  14. Linda Hoffmann says

    February 27, 2012 at 12:33 pm

    I am looking for coats and clark B 487 pattern book with childs petal sweater pattern. I made this in the 60’s, but can’t locate the pattern. Any help would be greatly appreciated…

  15. sue pendry says

    April 24, 2012 at 3:45 pm

    looking for childs jiffy petal cardigan please help

  16. sue pendry says

    April 24, 2012 at 3:49 pm

    I am desperat for the pattern Childs petal cardigan

  17. Lori says

    August 28, 2012 at 11:19 am

    I am looking for Book No. 166 baby Knitting & Crochet.

  18. Lynda Meyer says

    October 16, 2012 at 2:45 pm

    If you are still looking for petal cardigan or other top down cardigan patterns from the 1960s I have several I can share. Email me at [email protected]. Per child’s petal cardigan I have read that the number of stitches is the same as adult, just smaller yard and needles. Directions for child’s for sale online.

  19. Phyllis P. Corella says

    October 21, 2018 at 8:25 am

    I am looking for a Knit Cardigan and Socks Coats and Clarks B-578. Thank you.

  20. Pat says

    March 11, 2020 at 9:34 pm

    For Pearl Pullover (LW1349)

    CrR = slip next 2 sts onto cable holder and leave at back of work, k1, then knit 2 from holder
    CrL = slip next st onto cable holder and leave at front of work, k2, then k1 from holder

Have you read?

How To Do Kitchener Stitch: A Beginner-Friendly Guide To Grafting Knitting Seamlessly

Kitchener stitch is one of those knitting techniques that feels a little bit mysterious until you finally sit down and do it. It is often used to close the toes of socks, but it is also a wonderfully neat way to join two sets of live stitches together without making a bulky seam.

If you have ever finished a beautiful sock and then paused at the toe because the pattern says “graft remaining stitches,” this is the tutorial you want to keep handy.

Kitchener stitch, also called grafting, creates a row of stitches between two pieces of knitting so the join looks almost invisible. Instead of binding off and sewing two edges together, you use a tapestry needle and yarn to form a new row of knitting between the live stitches.

It is one of the most useful finishing techniques for knitters, especially if you enjoy knitting socks, mittens, cowls, loop scarves, or garments where a smooth join matters.

You might also like this older CraftGossip post on grafting with Kitchener stitch, and if you want to go deeper into finishing techniques, this post on mastering grafting in knitting is another helpful read.

What Is Kitchener Stitch?

Kitchener stitch is a method of grafting two sets of live stitches together. The stitches stay on two needles, usually held parallel to each other, and you use a threaded tapestry needle to work through the stitches in a specific order.

When done well, the finished join looks like one continuous piece of knitting.

This is why Kitchener stitch is so popular for:

  • sock toes
  • mitten tips
  • shoulder joins
  • cowls
  • loop scarves
  • seamless tube projects
  • underarm stitches on some sweaters
  • small knitted bags and pouches

It is most commonly used on stockinette stitch, but grafting can also be adapted for other stitch patterns once you understand the basic idea.

Why Use Kitchener Stitch Instead Of Sewing A Seam?

The biggest benefit of Kitchener stitch is that it creates a smooth, almost invisible join. That matters most in places where you do not want a bulky seam, such as the toe of a sock.

A sewn seam across a sock toe can feel uncomfortable inside a shoe. Kitchener stitch avoids that by creating a flat, flexible finish.

It also gives knitted items a more polished look. If you are making gifts, charity knits, socks, or heirloom-style projects, learning this one technique can make your finished pieces look much neater.

For knitters who enjoy socks, you may also like this roundup of knitting patterns using sock yarn, especially if you have leftover yarn after finishing a pair.

Supplies You Need

To work Kitchener stitch, you will need:

  • two knitting needles holding live stitches
  • a tapestry needle or darning needle
  • yarn tail or matching yarn
  • scissors
  • good lighting
  • a little patience the first time

If you are working sock toes, most patterns will tell you how many stitches to leave on each needle before grafting.

As a general guide, leave a yarn tail at least three times the width of the stitches you are grafting. If you are unsure, leave a little extra. It is much easier to weave in a longer tail than to run out halfway across.

A blunt-tip tapestry needle is easier to control than a sharp sewing needle because it slides between yarn strands without splitting them as much. You can find tapestry needles, sock knitting tools, stitch markers, and finishing supplies through places such as Amazon, Mary Maxim, or your favorite local yarn store.

Before You Start: Set Up Your Stitches

For standard Kitchener stitch on stockinette:

Hold the two needles parallel, with the wrong sides of the knitting facing each other.

The right side of the knitting should be facing out.

The needle closest to you is the front needle.

The needle farther away from you is the back needle.

Thread your yarn tail onto a tapestry needle.

Try to keep the stitches sitting neatly on the needles and avoid twisting them before you begin.

The Kitchener Stitch Mantra

Many knitters remember Kitchener stitch with this little rhythm:

Front needle: knit off, purl on.
Back needle: purl off, knit on.

That means:

On the front needle, go into the first stitch knitwise and take it off. Then go into the next stitch purlwise and leave it on.

On the back needle, go into the first stitch purlwise and take it off. Then go into the next stitch knitwise and leave it on.

Once you get into the rhythm, it becomes much less intimidating.

Kitchener Stitch Step-By-Step

Setup Step 1

Insert the tapestry needle into the first stitch on the front needle as if to purl.

Pull the yarn through.

Leave the stitch on the knitting needle.

Setup Step 2

Insert the tapestry needle into the first stitch on the back needle as if to knit.

Pull the yarn through.

Leave the stitch on the knitting needle.

Now you are ready to begin the repeating sequence.

Step 1: Front Needle, Knitwise, Off

Insert the tapestry needle into the first stitch on the front needle as if to knit.

Pull the yarn through.

Slip that stitch off the knitting needle.

Step 2: Front Needle, Purlwise, On

Insert the tapestry needle into the next stitch on the front needle as if to purl.

Pull the yarn through.

Leave that stitch on the knitting needle.

Step 3: Back Needle, Purlwise, Off

Insert the tapestry needle into the first stitch on the back needle as if to purl.

Pull the yarn through.

Slip that stitch off the knitting needle.

Step 4: Back Needle, Knitwise, On

Insert the tapestry needle into the next stitch on the back needle as if to knit.

Pull the yarn through.

Leave that stitch on the knitting needle.

Repeat these four steps until all stitches have been grafted.

A Simple Way To Remember It

Say this out loud as you work:

Knit off, purl on.
Purl off, knit on.

It feels silly the first few times, but it works. Many knitters mutter this little phrase while closing sock toes, and honestly, anything that helps you avoid losing your place is worth doing.

How Tight Should Kitchener Stitch Be?

One of the most common mistakes with Kitchener stitch is pulling the yarn too tightly.

You are not sewing a seam closed. You are creating a new row of knitting.

After every few stitches, gently adjust the tension so the grafted row matches the surrounding stitches. If you pull too tightly, the join may pucker. If you leave it too loose, the grafted row may look stretched out.

A good trick is to look at the stitches beside the graft and try to match their size.

Do not panic if it looks a little uneven while it is still on the needles. Kitchener stitch often looks better once everything is off the needles and the tension has been gently adjusted.

How To Finish The Last Stitches

When you get to the final stitches, continue the sequence as closely as possible.

If there is only one stitch left on a needle, work the “off” part of the sequence for that stitch.

Pull the yarn through gently and then weave the tail into the inside or wrong side of the project.

For socks, weave the end into the inside of the toe so it will not be visible.

Troubleshooting Kitchener Stitch

My graft looks too tight

You probably pulled the yarn too firmly as you worked. Use the tip of your tapestry needle to gently loosen each grafted stitch, working from one side to the other.

My graft looks loose

Gently snug up the grafted stitches one at a time. Do not yank the working yarn all at once, as this can make one area tight and another loose.

I lost my place

Pause and look at the stitches. If the last stitch was removed from the front needle, you are probably ready to work the “purl on” part on the front needle or move to the back needle. If you are a beginner, it helps to say the mantra out loud every single time.

I split the yarn

A blunt tapestry needle helps prevent splitting. If a stitch looks split and messy, carefully undo that part before continuing.

The join looks like a seam, not a row of knitting

This usually means the tension is too tight or the needle was inserted in the wrong direction on some stitches. Practice on a swatch before using Kitchener stitch on a special project.

Practice Before Grafting A Real Project

If Kitchener stitch makes you nervous, knit two small stockinette swatches and place the live stitches on two needles. Use a contrasting yarn to practice grafting across the stitches.

Practicing with a different color makes it easier to see what the grafted row is doing. Once you understand the movement, try again with matching yarn.

This is especially useful before grafting handmade socks, because sock toes are small and can feel fiddly the first few times.

When Else Can You Use Kitchener Stitch?

Kitchener stitch is most famous for sock toes, but it is helpful in many other knitting projects.

Use it for joining the ends of a cowl or loop scarf, especially when you start with a provisional cast on. This CraftGossip post on making loop scarves from stash yarn mentions using a provisional cast on so the ends can be grafted together neatly.

You can also use Kitchener stitch for small bags, seamless headbands, mitten tips, and some garment joins.

If you are brushing up on knitting basics, this post on favorite ways to cast on is a good companion read, especially if you are learning how different beginnings and endings affect the finish of a project.

Kitchener Stitch For Sock Knitters

If you knit socks from the cuff down, Kitchener stitch is one of the most useful finishing techniques you can learn.

Most cuff-down sock patterns end with a small number of stitches divided between two needles. Kitchener stitch closes those stitches without creating a ridge across the toe.

For a comfortable sock toe:

Keep the stitches evenly divided.

Do not pull the graft too tightly.

Check that the toe lies flat before weaving in the end.

Use matching yarn whenever possible.

Once the sock is finished, blocking can also help smooth the stitches and even out the graft.

If you enjoy knitting small accessories, you might also like these easy headband knitting patterns, which are great projects for practicing finishing techniques on something smaller than a sweater.

Kitchener stitch has a reputation for being tricky, but it is really just a short sequence repeated across two needles. Once you remember the rhythm — knit off, purl on, purl off, knit on — it becomes much easier.

The real secret is to slow down, keep your tension relaxed, and remember that you are creating a row of knitting, not stitching a seam shut.

It may not feel natural the first time, but after a few sock toes or practice swatches, Kitchener stitch becomes one of those finishing skills you will be glad to have in your knitting toolkit.

Categories

baby hat Baby Patterns Beginner Book Reviews cardigan Christmas CraftGossip Giveaways Craft News and Events Free Knitting Patterns Giveaways! Hats Knitting Articles Of Interest Knitting Patterns Knitting Technique & Ideas mittens Quick scarf shawl patterns socks Sweaters

Featured Posts

Knitty First Fall 2016 is live

Knitty Enters Fall with a New Look

sockupied giveaway

Giveaway: Sockupied

Make Your Own Beaded Bracelets

budwesier sweaters

A Post about Knitting, Twitter and…Budweiser?

A New Kind of Twin Set Knitting Pattern

RSS More Articles

  • Cross Stitch Ice Cream and Frozen Treats
  • 15 Charity Sewing Projects That Let You Sew Something Useful For A Good Cause
  • Sunflower Ribbon Embroidery Tutorials and Kits to Brighten Your Hoop
  • Decorating Mistakes That Make Your Living Room Feel Cluttered
  • Remembering Jill Smokler, Founder Of Scary Mommy
  • In the Garden Layer Cake – A Bloom-Filled Fabric Collection for Spring Sewing
  • How To Do Kitchener Stitch: A Beginner-Friendly Guide To Grafting Knitting Seamlessly
  • Pattern Review: Georgie Granny Square Bucket Hat Crochet Pattern
  • 12 Handmade Patriotic 4th of July Card Ideas
  • Shark Week Learning for Kids

Pick Your Blog

  • Sewing
  • Knitting
  • Quilting
  • Crochet
  • Home & Garden
  • Recycled Crafts
  • Scrapbooking
  • Card Making
  • Polymer Clay
  • Cross-Stitch
  • Edible Crafts
  • Felting
  • Glass Art
  • Indie Crafts
  • Kids Crafts
  • Jewelry Making
  • Lesson Plans
  • Needlework
  • Bath & Body
  • Party Ideas
  • Candle Making
  • DIY Weddings
  • Not Craft
  • Free Craft Projects

Copyright © 2026 · CraftGossip | Start Here | Contact Us | Link to Us | Your Editors | Privacy and affiliate policy