• Home
  • Suggest A DIY
  • DIY Newsletter

Knitting

Free Patterns, Tutorials and Project Ideas

  • About CraftGossip
  • Our Network
    • Bath & Body Crafts
    • Candle Making Ideas
    • Crochet Ideas
    • Cross Stitch
    • Edible Crafts
    • Felting Patterns
    • Glass Art
    • Home & Garden Ideas
    • Indie Crafts
    • Jewelry Making
    • Kids Crafts
    • Knitting Patterns
    • Lesson Plans
    • Needlework
    • Party Ideas
    • Polymer Clay
    • Quilting Ideas
    • Recycled Crafts
    • Scrapbooking
    • Sewing Patterns
    • Card Making
    • DIY Weddings
    • Not Craft Ideas
  • Giveaways
  • Roundups
  • Store
  • Search

Giveaway: A Head for Trouble

November 4, 2014 by Sarah White

a head for trouble giveaway

Congratulations to vanesseva!

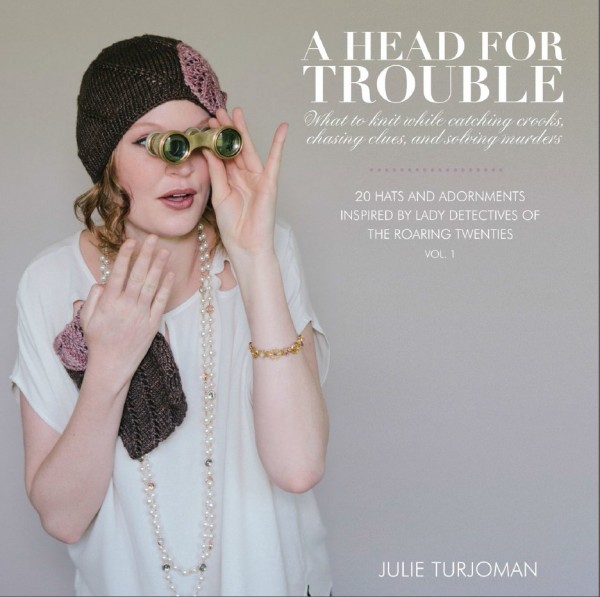
Last week I told you about the fun new book A Head for Trouble by Julie Turjoman, which is full of hats and accessories inspired by the fictional lady detectives of the 1920s. In it you’ll also learn a bit about hat fashion and construction and get bios of the leading ladies who inspired these fun fashions.

It’s a great book if you’re into flapper style, and I’m giving away a digital copy this week.

If you’d like a chance to win, leave a comment on this post before the end of the day Sunday, November 9. Why don’t you tell me if you could live in any other decade, which one would you choose. I think I’d go for the 1960s.

Thanks for visiting, commenting and sharing, and good luck!

Next Pattern:

  • Book Review - Head-to-Toe Winter Knits
  • A Beautiful Way to Keep Your Head Warm
  • Book Review: Colorwork Knitting from Head to Toe
«
»

Comments

  1. Susan says

    November 4, 2014 at 12:09 pm

    I’d choose the roaring 20s.

  2. Ronnie G says

    November 4, 2014 at 12:32 pm

    I am sitting here knitting, and watching Miss Fishers Murder Mysteries- and I have to say, the roaring 20’s are it! I would have loved to have known some of the women of those times- the daring and brave, head strong and trying to succeed in a man’s world. Thanks for the great question, and I hope I win so I can don my flapper hat and charleston in style!

  3. petoskeystone says

    November 4, 2014 at 12:39 pm

    While I enjoy late Edwardian fashions as well as the 20s (& 30s skirts) there isn’t any past decade I would want to live in. The future is where I look.

  4. Léa Gagné says

    November 4, 2014 at 1:34 pm

    If I could, i’d return in the 90’s… What cool years! New technology and everything..

  5. Manda Ess says

    November 4, 2014 at 2:55 pm

    Since I was young (this being the late 80’s/early 90’s) I’ve wanted to BE THERE in the late 1970’s, less than a decade before I was born… right in New York when post punk, hip hop and street art movements coalesced….the time of Warhol, grafitti, the scum manifesto, basquiat and the horrible music! Im drawn to the low income diy style of living from then….although i may not completely convey this look now…only a little bit 🙂

    Next choice would definitely be the mid century, preferably in the 50’s, as it reminds me of a childhood I dreamt I always had, surrounded with clean lines and colorful kitchen counters. While folks have just started to hoard this latest trend, I’ve always had an always building, eclectic mix of midcentury items since early high school. I would make quite a pretty penny if I wasn’t so attached to my things!

    Two totally different era’s, with completely different looks!

  6. Diana T. says

    November 4, 2014 at 4:13 pm

    I would chose to live in the 1920s – the style, the outfits, the music… I think I would really enjoy myself.

  7. Heather R. says

    November 4, 2014 at 4:22 pm

    I think I’d like to try out one of the decades coming up- didn’t all of the futurist’s writings make times like 2050 sound fantastic??? (I still want a flying car!) This looks like a lovely book- thank you for the giveaway! 😉

  8. monicawalkthetalk says

    November 4, 2014 at 4:44 pm

    I love the fashions of the 20s through the 40s….my grandparents’ and parents’ eras. Apparently the grandmother I never met was quite the flapper gal in her youth.

  9. Tamara@Etcetorize says

    November 4, 2014 at 6:11 pm

    It’s hard to choose…I’d like to visit ancient Egypt but I also love the fashions of the 1920’s so that would be a fun time visit too!

  10. Kitten With A Whiplash says

    November 4, 2014 at 6:22 pm

    Seeing as how I’ve already lived in 7 decades, EEEEEK!, I have to go pretty far back to find one that I’ve not already messed up in. In fact rather than choose a decade, I’d like to pick a couple moments in history that I wish I could have enjoyed.

    Since my all-time goddess of music is Ella Fitzgerald, I’d love to have been at the Apollo Theater in 1934 when she first appeared in their talent contest. Then I’d hop up to VE and VJ days to celebrate the (all too fleeting) peace after the end of WWII. After that it would be pretty kewl to jump to the 50s and watch myself arrive on the planet.

  11. Deanna says

    November 4, 2014 at 11:07 pm

    Would love a batch of new hats for the upcoming wintery days.

  12. MelodyJ says

    November 5, 2014 at 2:06 am

    I would like to visit many decades. All time periods have both good and bad in it.

  13. lindarumsey says

    November 5, 2014 at 4:44 am

    I would like to try living in the fifties, with the war and rationing behind us and colour and style decorating all areas of life.

  14. craftyone says

    November 5, 2014 at 7:41 am

    I think fifties.

  15. Kristin says

    November 5, 2014 at 8:24 am

    I would like to win this for my sister.

    I’ve been told I live in the ’30s.

  16. amchart says

    November 5, 2014 at 11:49 am

    ’50s – I want to be June Cleaver!

  17. Marilyn Fenton says

    November 5, 2014 at 11:55 am

    I’d say the 40’s, when everyone was pulling together for the war effort.
    wahoomerryf on Ravelry

  18. Rebecca Boukikaz says

    November 5, 2014 at 12:44 pm

    Today is where I want to be, looking forward to tomorrow.

  19. Karey says

    November 5, 2014 at 12:53 pm

    I’m definitely a 1960s girl!

  20. Iryna Boehland says

    November 5, 2014 at 12:55 pm

    60th as well! 🙂 thank you!

  21. Nangy says

    November 5, 2014 at 5:02 pm

    I would love to go way back to the 1950s,When times were slower.GIVE ME MAYBERRY!!!! HA!HA!HA!!!!

  22. Theresa says

    November 5, 2014 at 5:50 pm

    I have to laugh at the replies which said the 50s and the 70s since I grew up during those years—makes me start to feel old!! I would love to visit the roaring 20s. My grandmother always talked about them and how wild she was–would love the chance to experience those days with her. I love the clothing of the colonial era, but I do not think I would have made a very good pioneer. I do not care for cold weather and without the modern convenience of heaters, I would freeze for sure!!

  23. Pat morris says

    November 5, 2014 at 6:03 pm

    I was a teen in the 70s it was nice to be young but, I’d have to say the 90s because I really enjoyed raising my 3 children during that time.

  24. Jane S. says

    November 5, 2014 at 7:48 pm

    That’s a tough one! I was born in 1960 and I think it would have been fun to have been a young adult during the sixties rather than a little kid. I also like the 20’s, it sounds like it would have been an exciting time with lots of new discoveries and changes in the world.

    Thank you for the chance to win this book. These hats would suit my girls very well. 🙂

  25. Mary G says

    November 5, 2014 at 10:05 pm

    I appreciate everything the past has accomplished …that I have the ability to enjoy life today and would love to experience far into to future… to have real peace…. Thanks for the giveaway!

  26. Elaine Williams says

    November 6, 2014 at 3:30 am

    The 60s of course

  27. Ofelia says

    November 6, 2014 at 3:58 am

    Maybe 20s, 30s…and I would like to try the 40s, 50s…
    Can I try all of them please? 😉

  28. cwknitnut says

    November 6, 2014 at 8:42 am

    It would have to be the “taming of the west” days for me! Fresh air, growing your own food, making your own clothes – relying on yourself and other people. Would miss my computer friends but not the phone!!! 🙂

  29. margay1122 says

    November 6, 2014 at 10:22 am

    Hmm, maybe the 50s.

  30. Andrea B says

    November 6, 2014 at 11:34 am

    I’d go with the 20’s too – pre technology

  31. kim says

    November 7, 2014 at 7:38 am

    Love all that is vintage, but would still want my microwave if i was a 50’s housewife.

  32. calypso says

    November 7, 2014 at 8:08 am

    I’d love to be in the 70’s, flower power fashion!

  33. vanesseva says

    November 7, 2014 at 9:56 pm

    I agree with “Kitten with a whiplash” in that I would love to visit certain periods in time but not actually live in any of them. All of the time periods have their good and bad times. Thank you for this contest.

  34. Victorai Meadows says

    November 8, 2014 at 10:27 am

    I would love to take a trip back in time to the 20’s,30’s and 40’s. The fashion of those times for women were amazing!! Love them.,

  35. Carmen N says

    November 8, 2014 at 10:07 pm

    I like the 1950’s

Have you read?

How To Do Kitchener Stitch: A Beginner-Friendly Guide To Grafting Knitting Seamlessly

Kitchener stitch is one of those knitting techniques that feels a little bit mysterious until you finally sit down and do it. It is often used to close the toes of socks, but it is also a wonderfully neat way to join two sets of live stitches together without making a bulky seam.

If you have ever finished a beautiful sock and then paused at the toe because the pattern says “graft remaining stitches,” this is the tutorial you want to keep handy.

Kitchener stitch, also called grafting, creates a row of stitches between two pieces of knitting so the join looks almost invisible. Instead of binding off and sewing two edges together, you use a tapestry needle and yarn to form a new row of knitting between the live stitches.

It is one of the most useful finishing techniques for knitters, especially if you enjoy knitting socks, mittens, cowls, loop scarves, or garments where a smooth join matters.

You might also like this older CraftGossip post on grafting with Kitchener stitch, and if you want to go deeper into finishing techniques, this post on mastering grafting in knitting is another helpful read.

What Is Kitchener Stitch?

Kitchener stitch is a method of grafting two sets of live stitches together. The stitches stay on two needles, usually held parallel to each other, and you use a threaded tapestry needle to work through the stitches in a specific order.

When done well, the finished join looks like one continuous piece of knitting.

This is why Kitchener stitch is so popular for:

  • sock toes
  • mitten tips
  • shoulder joins
  • cowls
  • loop scarves
  • seamless tube projects
  • underarm stitches on some sweaters
  • small knitted bags and pouches

It is most commonly used on stockinette stitch, but grafting can also be adapted for other stitch patterns once you understand the basic idea.

Why Use Kitchener Stitch Instead Of Sewing A Seam?

The biggest benefit of Kitchener stitch is that it creates a smooth, almost invisible join. That matters most in places where you do not want a bulky seam, such as the toe of a sock.

A sewn seam across a sock toe can feel uncomfortable inside a shoe. Kitchener stitch avoids that by creating a flat, flexible finish.

It also gives knitted items a more polished look. If you are making gifts, charity knits, socks, or heirloom-style projects, learning this one technique can make your finished pieces look much neater.

For knitters who enjoy socks, you may also like this roundup of knitting patterns using sock yarn, especially if you have leftover yarn after finishing a pair.

Supplies You Need

To work Kitchener stitch, you will need:

  • two knitting needles holding live stitches
  • a tapestry needle or darning needle
  • yarn tail or matching yarn
  • scissors
  • good lighting
  • a little patience the first time

If you are working sock toes, most patterns will tell you how many stitches to leave on each needle before grafting.

As a general guide, leave a yarn tail at least three times the width of the stitches you are grafting. If you are unsure, leave a little extra. It is much easier to weave in a longer tail than to run out halfway across.

A blunt-tip tapestry needle is easier to control than a sharp sewing needle because it slides between yarn strands without splitting them as much. You can find tapestry needles, sock knitting tools, stitch markers, and finishing supplies through places such as Amazon, Mary Maxim, or your favorite local yarn store.

Before You Start: Set Up Your Stitches

For standard Kitchener stitch on stockinette:

Hold the two needles parallel, with the wrong sides of the knitting facing each other.

The right side of the knitting should be facing out.

The needle closest to you is the front needle.

The needle farther away from you is the back needle.

Thread your yarn tail onto a tapestry needle.

Try to keep the stitches sitting neatly on the needles and avoid twisting them before you begin.

The Kitchener Stitch Mantra

Many knitters remember Kitchener stitch with this little rhythm:

Front needle: knit off, purl on.
Back needle: purl off, knit on.

That means:

On the front needle, go into the first stitch knitwise and take it off. Then go into the next stitch purlwise and leave it on.

On the back needle, go into the first stitch purlwise and take it off. Then go into the next stitch knitwise and leave it on.

Once you get into the rhythm, it becomes much less intimidating.

Kitchener Stitch Step-By-Step

Setup Step 1

Insert the tapestry needle into the first stitch on the front needle as if to purl.

Pull the yarn through.

Leave the stitch on the knitting needle.

Setup Step 2

Insert the tapestry needle into the first stitch on the back needle as if to knit.

Pull the yarn through.

Leave the stitch on the knitting needle.

Now you are ready to begin the repeating sequence.

Step 1: Front Needle, Knitwise, Off

Insert the tapestry needle into the first stitch on the front needle as if to knit.

Pull the yarn through.

Slip that stitch off the knitting needle.

Step 2: Front Needle, Purlwise, On

Insert the tapestry needle into the next stitch on the front needle as if to purl.

Pull the yarn through.

Leave that stitch on the knitting needle.

Step 3: Back Needle, Purlwise, Off

Insert the tapestry needle into the first stitch on the back needle as if to purl.

Pull the yarn through.

Slip that stitch off the knitting needle.

Step 4: Back Needle, Knitwise, On

Insert the tapestry needle into the next stitch on the back needle as if to knit.

Pull the yarn through.

Leave that stitch on the knitting needle.

Repeat these four steps until all stitches have been grafted.

A Simple Way To Remember It

Say this out loud as you work:

Knit off, purl on.
Purl off, knit on.

It feels silly the first few times, but it works. Many knitters mutter this little phrase while closing sock toes, and honestly, anything that helps you avoid losing your place is worth doing.

How Tight Should Kitchener Stitch Be?

One of the most common mistakes with Kitchener stitch is pulling the yarn too tightly.

You are not sewing a seam closed. You are creating a new row of knitting.

After every few stitches, gently adjust the tension so the grafted row matches the surrounding stitches. If you pull too tightly, the join may pucker. If you leave it too loose, the grafted row may look stretched out.

A good trick is to look at the stitches beside the graft and try to match their size.

Do not panic if it looks a little uneven while it is still on the needles. Kitchener stitch often looks better once everything is off the needles and the tension has been gently adjusted.

How To Finish The Last Stitches

When you get to the final stitches, continue the sequence as closely as possible.

If there is only one stitch left on a needle, work the “off” part of the sequence for that stitch.

Pull the yarn through gently and then weave the tail into the inside or wrong side of the project.

For socks, weave the end into the inside of the toe so it will not be visible.

Troubleshooting Kitchener Stitch

My graft looks too tight

You probably pulled the yarn too firmly as you worked. Use the tip of your tapestry needle to gently loosen each grafted stitch, working from one side to the other.

My graft looks loose

Gently snug up the grafted stitches one at a time. Do not yank the working yarn all at once, as this can make one area tight and another loose.

I lost my place

Pause and look at the stitches. If the last stitch was removed from the front needle, you are probably ready to work the “purl on” part on the front needle or move to the back needle. If you are a beginner, it helps to say the mantra out loud every single time.

I split the yarn

A blunt tapestry needle helps prevent splitting. If a stitch looks split and messy, carefully undo that part before continuing.

The join looks like a seam, not a row of knitting

This usually means the tension is too tight or the needle was inserted in the wrong direction on some stitches. Practice on a swatch before using Kitchener stitch on a special project.

Practice Before Grafting A Real Project

If Kitchener stitch makes you nervous, knit two small stockinette swatches and place the live stitches on two needles. Use a contrasting yarn to practice grafting across the stitches.

Practicing with a different color makes it easier to see what the grafted row is doing. Once you understand the movement, try again with matching yarn.

This is especially useful before grafting handmade socks, because sock toes are small and can feel fiddly the first few times.

When Else Can You Use Kitchener Stitch?

Kitchener stitch is most famous for sock toes, but it is helpful in many other knitting projects.

Use it for joining the ends of a cowl or loop scarf, especially when you start with a provisional cast on. This CraftGossip post on making loop scarves from stash yarn mentions using a provisional cast on so the ends can be grafted together neatly.

You can also use Kitchener stitch for small bags, seamless headbands, mitten tips, and some garment joins.

If you are brushing up on knitting basics, this post on favorite ways to cast on is a good companion read, especially if you are learning how different beginnings and endings affect the finish of a project.

Kitchener Stitch For Sock Knitters

If you knit socks from the cuff down, Kitchener stitch is one of the most useful finishing techniques you can learn.

Most cuff-down sock patterns end with a small number of stitches divided between two needles. Kitchener stitch closes those stitches without creating a ridge across the toe.

For a comfortable sock toe:

Keep the stitches evenly divided.

Do not pull the graft too tightly.

Check that the toe lies flat before weaving in the end.

Use matching yarn whenever possible.

Once the sock is finished, blocking can also help smooth the stitches and even out the graft.

If you enjoy knitting small accessories, you might also like these easy headband knitting patterns, which are great projects for practicing finishing techniques on something smaller than a sweater.

Kitchener stitch has a reputation for being tricky, but it is really just a short sequence repeated across two needles. Once you remember the rhythm — knit off, purl on, purl off, knit on — it becomes much easier.

The real secret is to slow down, keep your tension relaxed, and remember that you are creating a row of knitting, not stitching a seam shut.

It may not feel natural the first time, but after a few sock toes or practice swatches, Kitchener stitch becomes one of those finishing skills you will be glad to have in your knitting toolkit.

Categories

baby hat Baby Patterns Beginner Book Reviews cardigan Christmas CraftGossip Giveaways Craft News and Events Free Knitting Patterns Giveaways! Hats Knitting Articles Of Interest Knitting Patterns Knitting Technique & Ideas mittens Quick scarf shawl patterns socks Sweaters

Featured Posts

Do You KIP?

Rainbow Knitting Patterns for Pride and Beyond

Book Review – Alice Starmore’s Book of Fair Isle Knitting

Easy Pencil Pouch Knitting Pattern

Road’s End Colorwork Tank Top Knitting Pattern

RSS More Articles

  • Cross Stitch Ice Cream and Frozen Treats
  • 15 Charity Sewing Projects That Let You Sew Something Useful For A Good Cause
  • Sunflower Ribbon Embroidery Tutorials and Kits to Brighten Your Hoop
  • Decorating Mistakes That Make Your Living Room Feel Cluttered
  • Remembering Jill Smokler, Founder Of Scary Mommy
  • In the Garden Layer Cake – A Bloom-Filled Fabric Collection for Spring Sewing
  • How To Do Kitchener Stitch: A Beginner-Friendly Guide To Grafting Knitting Seamlessly
  • Pattern Review: Georgie Granny Square Bucket Hat Crochet Pattern
  • 12 Handmade Patriotic 4th of July Card Ideas
  • Shark Week Learning for Kids

Pick Your Blog

  • Sewing
  • Knitting
  • Quilting
  • Crochet
  • Home & Garden
  • Recycled Crafts
  • Scrapbooking
  • Card Making
  • Polymer Clay
  • Cross-Stitch
  • Edible Crafts
  • Felting
  • Glass Art
  • Indie Crafts
  • Kids Crafts
  • Jewelry Making
  • Lesson Plans
  • Needlework
  • Bath & Body
  • Party Ideas
  • Candle Making
  • DIY Weddings
  • Not Craft
  • Free Craft Projects

Copyright © 2026 · CraftGossip | Start Here | Contact Us | Link to Us | Your Editors | Privacy and affiliate policy