• Home
  • Suggest A DIY
  • DIY Newsletter

Knitting

Free Patterns, Tutorials and Project Ideas

  • About CraftGossip
  • Our Network
    • Bath & Body Crafts
    • Candle Making Ideas
    • Crochet Ideas
    • Cross Stitch
    • Edible Crafts
    • Felting Patterns
    • Glass Art
    • Home & Garden Ideas
    • Indie Crafts
    • Jewelry Making
    • Kids Crafts
    • Knitting Patterns
    • Lesson Plans
    • Needlework
    • Party Ideas
    • Polymer Clay
    • Quilting Ideas
    • Recycled Crafts
    • Scrapbooking
    • Sewing Patterns
    • Card Making
    • DIY Weddings
    • Not Craft Ideas
  • Giveaways
  • Roundups
  • Store
  • Search

Giveaway: Knee-sel for Holding Knitting Patterns

March 7, 2016 by Sarah White

knee-sel knitting chart holder

Rose is the winner!

I’ve been doing some spring cleaning in my office (even though it’s not quite spring yet, it certainly feels like it!) and I found this little gadget and thought someone might like it.

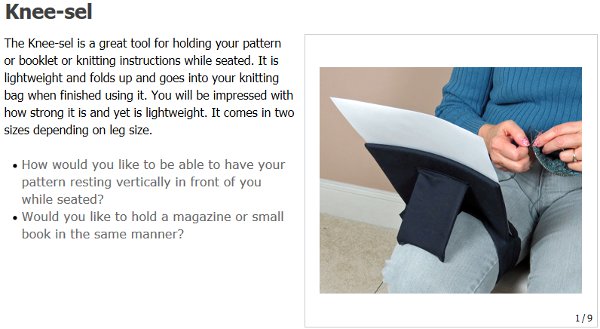
The Knee-sel from Nancy’s Knit Knacks is a little fabric easel, for lack of a better word, that is sturdy enough to hold your pattern in place while you’re knitting from a chart. It straps around your leg and also props up against your leg to hold the chart or pattern where you can see it. It also has a little pouch to hold a pen for marking what row you are on or taking notes (it could also hold a cable needle).

I never tried this so it is new in the bag. Mine is size small, which is says is for a 15-25 inch leg. It’s sold black and measures 8 inches wide, 6.5 inches tall and 5/16 inch thick. They retail for $29.99

for full information and more pictures of the Knee-sel in action.

If you’d like a chance to win this, leave a comment on this post before the end of the day Sunday, March 13. I’d love to know if you have any tricks for keeping up with where you are in a chart, or what you would use this gadget for.

Thanks for visiting, commenting and sharing, and good luck!

[Photo via Nancy’s Knit Knacks.]

Next Pattern:

  • Use Your Stash Faster by Holding Two Strands Together
  • Circular Knitting Machine Hat Knitting Patterns
  • Book Review - 52 Weeks of Socks: Beautiful patterns…
«
»

Comments

  1. Dani says

    March 7, 2016 at 3:10 pm

    What a clever little gadget! Sure would help me not lose my place after I drop the pattern

  2. Amy Wiener says

    March 7, 2016 at 3:15 pm

    This is so neat! I am trying to learn to do more patterns so this wold be perfect

  3. Monica says

    March 7, 2016 at 3:22 pm

    I’d love this gadget and think its very nice of you to want to give it away like this.

  4. KK says

    March 7, 2016 at 4:14 pm

    I’d love to win this ti give to my nearly 100 year old Grandmother who is still and avid knitter but needs her patterns close enough to be able to see them, this would be a PERFECT solution for her!

  5. Cindy S says

    March 7, 2016 at 4:19 pm

    What a Kneat idea! I often have my clipboard propped up with my leg — or try to.

  6. Isabelle says

    March 7, 2016 at 4:32 pm

    Would love to use this for my knitting!! I often like to sit on this couch in my house but there’s no low table to go with it, so it’s always a bit of a struggle!! This would be amazing!

  7. Janet says

    March 7, 2016 at 5:09 pm

    Now that would save me grovelling under the sofa for it when I need to read the next bit!

  8. Margaret Stewart says

    March 7, 2016 at 5:24 pm

    What a fantastic idea I would love to have this as I now have problems gripping it would be ideal

  9. miblueowl says

    March 7, 2016 at 5:58 pm

    This looks like something I would like to try while riding in the car (long road trip).

  10. Diane Simone says

    March 7, 2016 at 6:30 pm

    In think this would be extremely helpful and would make my knitting, crocheting and cross stitch much quicker and easier!

  11. Terry Paron says

    March 7, 2016 at 6:43 pm

    That looks like a great gadget. I’m always trying to find the perfect way to support my charts while I knit.

  12. Christine says

    March 7, 2016 at 6:59 pm

    I would love this for my friend who loves to just knit.

  13. Theresa says

    March 7, 2016 at 7:42 pm

    I could sure use one of these. I always put my book/pattern on my desk, then the cat jumps up, knocking the pattern to the floor. Pick it back up, try to balance it in my lap which never works. Thanks for the chance to win.

  14. Rose Schlem says

    March 7, 2016 at 8:19 pm

    A great looking device, besides knitting should work just as well for crochet patterns!

  15. Kim says

    March 7, 2016 at 8:30 pm

    That looks really handy!

  16. Lorraine Gondek says

    March 7, 2016 at 8:35 pm

    Great idea! I’d like one but I’d rather see Vicki K get it!

  17. Cynthia Wilbanks says

    March 7, 2016 at 8:46 pm

    I’ve used everything from a belly board to a music stand to hold my patterns! Each have their pros & cons. Would love to give this a try!

  18. Martha says

    March 7, 2016 at 9:29 pm

    When using a chart I use a metal board and a magnet (this one was from when I did cross stitch) When just counting rows, I use the county app on my Kindle. And I have an ingenuous set of stitch markers for counting things like rows for cables.

  19. Marien canales says

    March 7, 2016 at 9:56 pm

    Awesome idea.. I use a clipboard, but I have to struggle with it. So, that knee-sel its a super great idea.

  20. sheila_g says

    March 7, 2016 at 10:19 pm

    I always try to balance patterns etc. on my lap without a lot of success! Thanks for the chance to win!

  21. Rosey175 says

    March 7, 2016 at 11:01 pm

    I usually set the pattern on the edge of the couch arm. Cats find it great fun to jump on it. Knock it off. Sleep on it. Sleep on my lap… would this prevent that? I’d love to find out haha!

  22. Genoveva Barbosa says

    March 7, 2016 at 11:27 pm

    I think this a nifty item, i am a sewer but i would love to get this for my daughter (the knitter). I know she would put it to good use. Thank you for this opportunity.

  23. Jayne Vossen says

    March 8, 2016 at 1:30 am

    This looks really great to hold my knitting pattern whilst knitting. Thanks for the chance!

  24. KW Seah says

    March 8, 2016 at 4:05 am

    Do you think you can send me some detail pictures to my email so I can try to figure out how to DIY one for my sister who knits? Thanks.

  25. Heather Mitchell says

    March 8, 2016 at 8:53 am

    Looks like a great “why didn’t I think of this” gadget! When I tire of poring over my paper copies on the couch beside me, I sometimes resort to pulling patterns up on the computer screen and enlarging them enough so can refer to the row I’m working on (normally the the bottom line or top line) and scrolling away as I work…not so handy when I’m watching Netflix while I knit though!

  26. grandyrocks says

    March 8, 2016 at 2:49 pm

    oh such a great idea. I could have used this so many times if I had known about it. Love this idea

  27. Rose Scott says

    March 8, 2016 at 3:26 pm

    What an awesome looking gadget. I bet it could finally be the tool to keep my dogs from knocking my patterns all over the place on me.

  28. Jodi says

    March 8, 2016 at 4:29 pm

    I’m glad to read that I’m not the only knitter who has cats that must contribute to the creative purr-cess. 🙂

    I’m mostly using my iPad for patterns: I print out the patterns and then hold them on a TV table using the iPad as a weight. Maybe not the best use of my tech toys.

  29. Faye Hope says

    March 8, 2016 at 10:29 pm

    The knee-sel looks like a great idea i would love to win it and try it out. I am thinking also of my mothers arthritis fingers and pages slipping out between them, i would most likely give it to her if she could use it.

  30. Jeanette Cardin says

    March 9, 2016 at 11:38 am

    This looks great! I am an avid knitter. Would save lots of time chasing a fallen pattern. Just lost my husband, who was a great supporter of my knitting. He would have been impressed!

  31. Vicki says

    March 9, 2016 at 11:56 am

    My cat would probably find it wonderful to lay against. What a neat idea.

  32. honeybabe1 says

    March 9, 2016 at 4:38 pm

    I’d love one of these….what a brilliant gadget.

  33. yarnaddicted says

    March 9, 2016 at 6:29 pm

    Usually my pattern is in my lap and keeps moving around, I would like to try this pattern holder!
    Thanks, Kim Reid

  34. Dennis Mullins Sr says

    March 9, 2016 at 10:50 pm

    I could use this because my eye sight is not as good as it used to be it would bring the patterns closer and I would not lose my place trying to read it laying on the table. Thank you for a chance to own it.

  35. Jeanne says

    March 10, 2016 at 1:24 am

    My method for tracking my chart lines is kind of a hot mess, but after a 2 month long jag of lace knitting, my go to ruler is actually a nail file (the great big pink ones). It doesn’t slide, and it’s handy in my knitting bag (I must file frequently when knitting lace)
    I think the knee-sel would probably work with on of those magnetic chart holding thingies, but I’d probably use it to prop my book for reading while I’m knitting.

  36. Maureen says

    March 12, 2016 at 5:06 pm

    I usually rely on making a star by the line and having stitch markers.

  37. Joyce de la Rosa says

    March 13, 2016 at 2:28 pm

    What a ingenious idea. I don’t knit, but my daughter does. I’m always looking for neat little “just because” gifts for her. I’m going to have to find one of these up here in N.Idaho.

« Older Comments

Have you read?

How To Do Kitchener Stitch: A Beginner-Friendly Guide To Grafting Knitting Seamlessly

Kitchener stitch is one of those knitting techniques that feels a little bit mysterious until you finally sit down and do it. It is often used to close the toes of socks, but it is also a wonderfully neat way to join two sets of live stitches together without making a bulky seam.

If you have ever finished a beautiful sock and then paused at the toe because the pattern says “graft remaining stitches,” this is the tutorial you want to keep handy.

Kitchener stitch, also called grafting, creates a row of stitches between two pieces of knitting so the join looks almost invisible. Instead of binding off and sewing two edges together, you use a tapestry needle and yarn to form a new row of knitting between the live stitches.

It is one of the most useful finishing techniques for knitters, especially if you enjoy knitting socks, mittens, cowls, loop scarves, or garments where a smooth join matters.

You might also like this older CraftGossip post on grafting with Kitchener stitch, and if you want to go deeper into finishing techniques, this post on mastering grafting in knitting is another helpful read.

What Is Kitchener Stitch?

Kitchener stitch is a method of grafting two sets of live stitches together. The stitches stay on two needles, usually held parallel to each other, and you use a threaded tapestry needle to work through the stitches in a specific order.

When done well, the finished join looks like one continuous piece of knitting.

This is why Kitchener stitch is so popular for:

  • sock toes
  • mitten tips
  • shoulder joins
  • cowls
  • loop scarves
  • seamless tube projects
  • underarm stitches on some sweaters
  • small knitted bags and pouches

It is most commonly used on stockinette stitch, but grafting can also be adapted for other stitch patterns once you understand the basic idea.

Why Use Kitchener Stitch Instead Of Sewing A Seam?

The biggest benefit of Kitchener stitch is that it creates a smooth, almost invisible join. That matters most in places where you do not want a bulky seam, such as the toe of a sock.

A sewn seam across a sock toe can feel uncomfortable inside a shoe. Kitchener stitch avoids that by creating a flat, flexible finish.

It also gives knitted items a more polished look. If you are making gifts, charity knits, socks, or heirloom-style projects, learning this one technique can make your finished pieces look much neater.

For knitters who enjoy socks, you may also like this roundup of knitting patterns using sock yarn, especially if you have leftover yarn after finishing a pair.

Supplies You Need

To work Kitchener stitch, you will need:

  • two knitting needles holding live stitches
  • a tapestry needle or darning needle
  • yarn tail or matching yarn
  • scissors
  • good lighting
  • a little patience the first time

If you are working sock toes, most patterns will tell you how many stitches to leave on each needle before grafting.

As a general guide, leave a yarn tail at least three times the width of the stitches you are grafting. If you are unsure, leave a little extra. It is much easier to weave in a longer tail than to run out halfway across.

A blunt-tip tapestry needle is easier to control than a sharp sewing needle because it slides between yarn strands without splitting them as much. You can find tapestry needles, sock knitting tools, stitch markers, and finishing supplies through places such as Amazon, Mary Maxim, or your favorite local yarn store.

Before You Start: Set Up Your Stitches

For standard Kitchener stitch on stockinette:

Hold the two needles parallel, with the wrong sides of the knitting facing each other.

The right side of the knitting should be facing out.

The needle closest to you is the front needle.

The needle farther away from you is the back needle.

Thread your yarn tail onto a tapestry needle.

Try to keep the stitches sitting neatly on the needles and avoid twisting them before you begin.

The Kitchener Stitch Mantra

Many knitters remember Kitchener stitch with this little rhythm:

Front needle: knit off, purl on.
Back needle: purl off, knit on.

That means:

On the front needle, go into the first stitch knitwise and take it off. Then go into the next stitch purlwise and leave it on.

On the back needle, go into the first stitch purlwise and take it off. Then go into the next stitch knitwise and leave it on.

Once you get into the rhythm, it becomes much less intimidating.

Kitchener Stitch Step-By-Step

Setup Step 1

Insert the tapestry needle into the first stitch on the front needle as if to purl.

Pull the yarn through.

Leave the stitch on the knitting needle.

Setup Step 2

Insert the tapestry needle into the first stitch on the back needle as if to knit.

Pull the yarn through.

Leave the stitch on the knitting needle.

Now you are ready to begin the repeating sequence.

Step 1: Front Needle, Knitwise, Off

Insert the tapestry needle into the first stitch on the front needle as if to knit.

Pull the yarn through.

Slip that stitch off the knitting needle.

Step 2: Front Needle, Purlwise, On

Insert the tapestry needle into the next stitch on the front needle as if to purl.

Pull the yarn through.

Leave that stitch on the knitting needle.

Step 3: Back Needle, Purlwise, Off

Insert the tapestry needle into the first stitch on the back needle as if to purl.

Pull the yarn through.

Slip that stitch off the knitting needle.

Step 4: Back Needle, Knitwise, On

Insert the tapestry needle into the next stitch on the back needle as if to knit.

Pull the yarn through.

Leave that stitch on the knitting needle.

Repeat these four steps until all stitches have been grafted.

A Simple Way To Remember It

Say this out loud as you work:

Knit off, purl on.
Purl off, knit on.

It feels silly the first few times, but it works. Many knitters mutter this little phrase while closing sock toes, and honestly, anything that helps you avoid losing your place is worth doing.

How Tight Should Kitchener Stitch Be?

One of the most common mistakes with Kitchener stitch is pulling the yarn too tightly.

You are not sewing a seam closed. You are creating a new row of knitting.

After every few stitches, gently adjust the tension so the grafted row matches the surrounding stitches. If you pull too tightly, the join may pucker. If you leave it too loose, the grafted row may look stretched out.

A good trick is to look at the stitches beside the graft and try to match their size.

Do not panic if it looks a little uneven while it is still on the needles. Kitchener stitch often looks better once everything is off the needles and the tension has been gently adjusted.

How To Finish The Last Stitches

When you get to the final stitches, continue the sequence as closely as possible.

If there is only one stitch left on a needle, work the “off” part of the sequence for that stitch.

Pull the yarn through gently and then weave the tail into the inside or wrong side of the project.

For socks, weave the end into the inside of the toe so it will not be visible.

Troubleshooting Kitchener Stitch

My graft looks too tight

You probably pulled the yarn too firmly as you worked. Use the tip of your tapestry needle to gently loosen each grafted stitch, working from one side to the other.

My graft looks loose

Gently snug up the grafted stitches one at a time. Do not yank the working yarn all at once, as this can make one area tight and another loose.

I lost my place

Pause and look at the stitches. If the last stitch was removed from the front needle, you are probably ready to work the “purl on” part on the front needle or move to the back needle. If you are a beginner, it helps to say the mantra out loud every single time.

I split the yarn

A blunt tapestry needle helps prevent splitting. If a stitch looks split and messy, carefully undo that part before continuing.

The join looks like a seam, not a row of knitting

This usually means the tension is too tight or the needle was inserted in the wrong direction on some stitches. Practice on a swatch before using Kitchener stitch on a special project.

Practice Before Grafting A Real Project

If Kitchener stitch makes you nervous, knit two small stockinette swatches and place the live stitches on two needles. Use a contrasting yarn to practice grafting across the stitches.

Practicing with a different color makes it easier to see what the grafted row is doing. Once you understand the movement, try again with matching yarn.

This is especially useful before grafting handmade socks, because sock toes are small and can feel fiddly the first few times.

When Else Can You Use Kitchener Stitch?

Kitchener stitch is most famous for sock toes, but it is helpful in many other knitting projects.

Use it for joining the ends of a cowl or loop scarf, especially when you start with a provisional cast on. This CraftGossip post on making loop scarves from stash yarn mentions using a provisional cast on so the ends can be grafted together neatly.

You can also use Kitchener stitch for small bags, seamless headbands, mitten tips, and some garment joins.

If you are brushing up on knitting basics, this post on favorite ways to cast on is a good companion read, especially if you are learning how different beginnings and endings affect the finish of a project.

Kitchener Stitch For Sock Knitters

If you knit socks from the cuff down, Kitchener stitch is one of the most useful finishing techniques you can learn.

Most cuff-down sock patterns end with a small number of stitches divided between two needles. Kitchener stitch closes those stitches without creating a ridge across the toe.

For a comfortable sock toe:

Keep the stitches evenly divided.

Do not pull the graft too tightly.

Check that the toe lies flat before weaving in the end.

Use matching yarn whenever possible.

Once the sock is finished, blocking can also help smooth the stitches and even out the graft.

If you enjoy knitting small accessories, you might also like these easy headband knitting patterns, which are great projects for practicing finishing techniques on something smaller than a sweater.

Kitchener stitch has a reputation for being tricky, but it is really just a short sequence repeated across two needles. Once you remember the rhythm — knit off, purl on, purl off, knit on — it becomes much easier.

The real secret is to slow down, keep your tension relaxed, and remember that you are creating a row of knitting, not stitching a seam shut.

It may not feel natural the first time, but after a few sock toes or practice swatches, Kitchener stitch becomes one of those finishing skills you will be glad to have in your knitting toolkit.

Categories

baby hat Baby Patterns Beginner Book Reviews cardigan Christmas CraftGossip Giveaways Craft News and Events Free Knitting Patterns Giveaways! Hats Knitting Articles Of Interest Knitting Patterns Knitting Technique & Ideas mittens Quick scarf shawl patterns socks Sweaters

Featured Posts

vail light snow scarf

A Snowy Scarf for the End of Winter

doctor who scarf official pattern

The Official Way to Knit a Doctor Who Scarf

indie design giftalong

Grab a Deal on Knitting Designs through 11/29

circle cowl just crafty enough

Free Pattern: Giant Circular Cowl

Download Yarnspirations Patterns to Help Charity

RSS More Articles

  • Cross Stitch Ice Cream and Frozen Treats
  • 15 Charity Sewing Projects That Let You Sew Something Useful For A Good Cause
  • Sunflower Ribbon Embroidery Tutorials and Kits to Brighten Your Hoop
  • Decorating Mistakes That Make Your Living Room Feel Cluttered
  • Remembering Jill Smokler, Founder Of Scary Mommy
  • In the Garden Layer Cake – A Bloom-Filled Fabric Collection for Spring Sewing
  • How To Do Kitchener Stitch: A Beginner-Friendly Guide To Grafting Knitting Seamlessly
  • Pattern Review: Georgie Granny Square Bucket Hat Crochet Pattern
  • 12 Handmade Patriotic 4th of July Card Ideas
  • Shark Week Learning for Kids

Pick Your Blog

  • Sewing
  • Knitting
  • Quilting
  • Crochet
  • Home & Garden
  • Recycled Crafts
  • Scrapbooking
  • Card Making
  • Polymer Clay
  • Cross-Stitch
  • Edible Crafts
  • Felting
  • Glass Art
  • Indie Crafts
  • Kids Crafts
  • Jewelry Making
  • Lesson Plans
  • Needlework
  • Bath & Body
  • Party Ideas
  • Candle Making
  • DIY Weddings
  • Not Craft
  • Free Craft Projects

Copyright © 2026 · CraftGossip | Start Here | Contact Us | Link to Us | Your Editors | Privacy and affiliate policy