• Home
  • Suggest A DIY
  • DIY Newsletter

Knitting

Free Patterns, Tutorials and Project Ideas

  • About CraftGossip
  • Our Network
    • Bath & Body Crafts
    • Candle Making Ideas
    • Crochet Ideas
    • Cross Stitch
    • Edible Crafts
    • Felting Patterns
    • Glass Art
    • Home & Garden Ideas
    • Indie Crafts
    • Jewelry Making
    • Kids Crafts
    • Knitting Patterns
    • Lesson Plans
    • Needlework
    • Party Ideas
    • Polymer Clay
    • Quilting Ideas
    • Recycled Crafts
    • Scrapbooking
    • Sewing Patterns
    • Card Making
    • DIY Weddings
    • Not Craft Ideas
  • Giveaways
  • Roundups
  • Store
  • Search

Giveaway: Knee-sel for Holding Knitting Patterns

March 7, 2016 by Sarah White

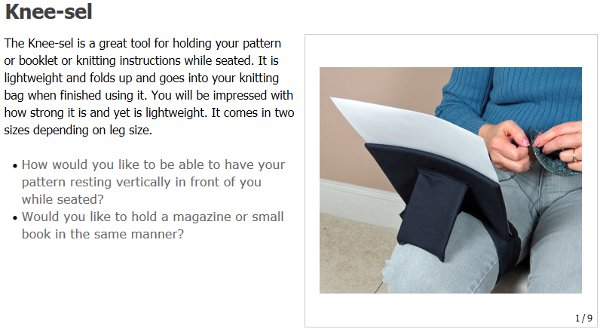
knee-sel knitting chart holder

Rose is the winner!

I’ve been doing some spring cleaning in my office (even though it’s not quite spring yet, it certainly feels like it!) and I found this little gadget and thought someone might like it.

The Knee-sel from Nancy’s Knit Knacks is a little fabric easel, for lack of a better word, that is sturdy enough to hold your pattern in place while you’re knitting from a chart. It straps around your leg and also props up against your leg to hold the chart or pattern where you can see it. It also has a little pouch to hold a pen for marking what row you are on or taking notes (it could also hold a cable needle).

I never tried this so it is new in the bag. Mine is size small, which is says is for a 15-25 inch leg. It’s sold black and measures 8 inches wide, 6.5 inches tall and 5/16 inch thick. They retail for $29.99

for full information and more pictures of the Knee-sel in action.

If you’d like a chance to win this, leave a comment on this post before the end of the day Sunday, March 13. I’d love to know if you have any tricks for keeping up with where you are in a chart, or what you would use this gadget for.

Thanks for visiting, commenting and sharing, and good luck!

[Photo via Nancy’s Knit Knacks.]
«
»

Comments

  1. lindarumsey says

    March 7, 2016 at 9:22 am

    I’ve never seen anything like this – would love to try it out!

  2. Dawn S says

    March 7, 2016 at 9:27 am

    What a neat idea! I would love to have one!

  3. knittingdancer says

    March 7, 2016 at 9:36 am

    I would use it when knitting in public and a table isn’t available.
    i keep my place on charts by using the highlighter tape so I can move it up to the next row after I finished a row.

  4. tracy says

    March 7, 2016 at 9:38 am

    Wow never seen one of these would love one would be so useful

  5. Flo says

    March 7, 2016 at 9:41 am

    This awesome!!! Thank you for the chance to win!

  6. Tasha says

    March 7, 2016 at 9:43 am

    I would love to try one of these. This would be so helpful holding my cross stitch patterns. And I highlight on my pattern to keep track of where I am. It helps a lot

  7. Grace S. says

    March 7, 2016 at 9:49 am

    I’d love to try this. Thanks for the chance!

  8. Rosanne says

    March 7, 2016 at 9:53 am

    I’d love this!

  9. Terri Heyne says

    March 7, 2016 at 10:27 am

    Boy, could I use this!! I do a lot of knitting and crocheting as I’m listening to TV shows. This is a great Idea!! Thank you for the giveaway!

  10. [email protected] says

    March 7, 2016 at 10:44 am

    Would love to try this. I currently use the sofa arm, which is not the best angle.

  11. joan foltz says

    March 7, 2016 at 10:58 am

    Would love to have one

  12. Helen King says

    March 7, 2016 at 11:03 am

    This would be awesome when traveling. It’s hard to keep your pattern in easy reach when riding in a car, this would make it so much easier.

  13. Maribeth says

    March 7, 2016 at 11:03 am

    I would like this. Our animals like to lay on the pattern I’m using. This could be great.

  14. Cathy Presley says

    March 7, 2016 at 11:10 am

    Would definitely love one of these, 2 or 3 actually!!

  15. Vicki K says

    March 7, 2016 at 11:12 am

    My husband is a cancer patient so I spend HOURS sitting in waiting rooms during his treatments. This gadget would make it so much easier for me to follow a pattern as there are never enough tables next to chairs on which to layout my instructions. Love the idea of this – convenient, portable & useful – with this I could actually knit things that don’t require me to memorize patterns and then end up doing a lot more frogging than knitting! Think I’ve developed chemo brain by osmosis!

  16. Beth Visak says

    March 7, 2016 at 11:20 am

    I would use this for holding my cross stitch patterns, not knitting. How clever.

  17. Lesta says

    March 7, 2016 at 11:31 am

    I really need this as I must keep my patterns close as my eyesight gets worst as I get older

  18. Kathi says

    March 7, 2016 at 11:31 am

    I could use this for quilling when I need to make different shapes, while I watch TV. What a great idea!

  19. Eleanor Ilsley says

    March 7, 2016 at 11:41 am

    What a great idea,l knit and crochet a lot and l’m always dropping my patterns and losing my place. This would good to use on a train,coach or airplane

  20. Kate Swain says

    March 7, 2016 at 11:45 am

    I knit baby hats for the hospital and this would be so handy for holding the pattern

  21. Kath U says

    March 7, 2016 at 11:45 am

    What a genius idea! I usually use a Post-it note to mark my place in my pattern.

  22. Jami F says

    March 7, 2016 at 11:55 am

    Very Clever.

  23. Pat Schwab says

    March 7, 2016 at 11:55 am

    What a great idea. Thanks

  24. Cindy Fuchs says

    March 7, 2016 at 11:56 am

    I do a lot of lace knitting and use charts. This would be very helpful.

  25. leslieblatt says

    March 7, 2016 at 12:00 pm

    Very interesting! I would love a chance to win this.

  26. Fiadhnat says

    March 7, 2016 at 12:03 pm

    I mark each row when I have completed it. Use stitch markers between each pattern repeat/section. Lifelines are a must! Don’t remove a lifeline until you have done a few rows after putting in a second lifeline. Handy to use a metal tray at back and a magnet glued to a ruler on the front.

  27. Jean says

    March 7, 2016 at 12:20 pm

    This is something that I could truly use. Love it.

  28. yolanda v says

    March 7, 2016 at 12:20 pm

    What a cool idea! I usually use the pattern and post-its!

  29. Dawn Hull says

    March 7, 2016 at 12:27 pm

    I do a lot of my knitting, so space is always at a premium. Can see this being really useful away from home.

  30. Louisa Neveau says

    March 7, 2016 at 12:29 pm

    I would love a chance to win this item. How handy to use while knitting and riding in the car! Love this.

  31. Eileen Hughes says

    March 7, 2016 at 12:36 pm

    I tried using the car in my lap the pattern on. Not much luck there!

  32. Carolyn Holmes says

    March 7, 2016 at 12:48 pm

    What a nifty product! I’m a cross stitcher and this would be ideal while I travel. I use a highlighter to mark what I’ve completed and it’s difficult to balance everything on that tiny plane table!

  33. Liinda Ragsdale says

    March 7, 2016 at 1:04 pm

    This looks like a brilliant solution for a major frustration! And I appreciate the tips in other comments… definitely learned a couple of good ideas, so thanks!!!

  34. Mary Oechler says

    March 7, 2016 at 1:06 pm

    Have a hard time looking at a pattern while knitting, this is perfect

  35. Sayonna George says

    March 7, 2016 at 1:08 pm

    This would be nice to have while traveling in the car on long trips. I would really like to have it. I would for use it at home so I don’t have to pick up the instructions from the table or knitting bag.

  36. Elaine R. says

    March 7, 2016 at 1:09 pm

    It would be great to hold the pattern when I’m sitting on the sofa. As I use reading glasses any other easel is too far away to read easily.

  37. Kitty says

    March 7, 2016 at 1:17 pm

    This would be great!! It would be super helpful with my current situation. I wish I had something like this when my baby was small and needed rocking. 🙂
    -Kitty

  38. Ricky says

    March 7, 2016 at 1:23 pm

    Interesting and worth a try.

  39. Catie says

    March 7, 2016 at 1:29 pm

    I use the see-thru colored tape to mark pattern lines and usually stick the pattern on a book holder. This would probably me more convenient tho! Thank you.

  40. Vivian Helton says

    March 7, 2016 at 1:36 pm

    I would love to win something like this as I do a lot of knitting (and crocheting) in the car. I use colored pencils to mark where I am in a pattern. Easy to erase when I am done or use a different color next time!

  41. jo says

    March 7, 2016 at 1:36 pm

    this looks like a “gadget” that is actually very helpful! Wouldn’t be stuck in a corner & forgotten!

  42. Nangy says

    March 7, 2016 at 1:39 pm

    My daughter would love this,she has a special needs son,they travel in a camper so her space is limited,she could really use this to hold her patterns! Thank you for the giveaway!

  43. Vanesa says

    March 7, 2016 at 1:47 pm

    What a great idea!!! Genius. I would love one! Stop to old the paper or to count rows sucks 🙂

  44. Victoria says

    March 7, 2016 at 1:57 pm

    What an innovative idea!

  45. Nan Davis says

    March 7, 2016 at 1:59 pm

    Thank you for this awesome give-a-way. I would love a chance at this item. I could use it for all my needle crafts – knitting, crochet, cross stitch, needlepoint. The possibilities are endless.

  46. Shannon says

    March 7, 2016 at 2:24 pm

    What a wonderful invention – wish I would have thought of it all those times I needed to closely follow a detailed pattern step. I would use this for knitting or crochet. Oh – this would be good for needlework too. I need one of these.

  47. joyce says

    March 7, 2016 at 2:36 pm

    I have never seen anything like this before. I would definitely use it for knitting.

  48. Susan Spiers says

    March 7, 2016 at 2:43 pm

    Why didn’t I think of this? Great idea. I mark the row on the pattern when it is done, and set my pattern on the arm of my chair, this would be so much easier!

  49. audrajo1 says

    March 7, 2016 at 2:48 pm

    what a nifty idea! would love this I’m sure. thanks for the chance!

  50. Peggy R says

    March 7, 2016 at 2:57 pm

    This is such an ingenious invention, and one that I could really make use of – especially when knitting in the car!! I’m currently using a book holder, with post its’ to keep track of the row I’m on, and a note book to mark the rows I’ve completed. In the car, I have to keep the pattern flat on the seat, or on my lap. It gets hard to do in the Winter. Thank you for such a great giveaway!! This is the best one yet!!

Newer Comments »

Have you read?

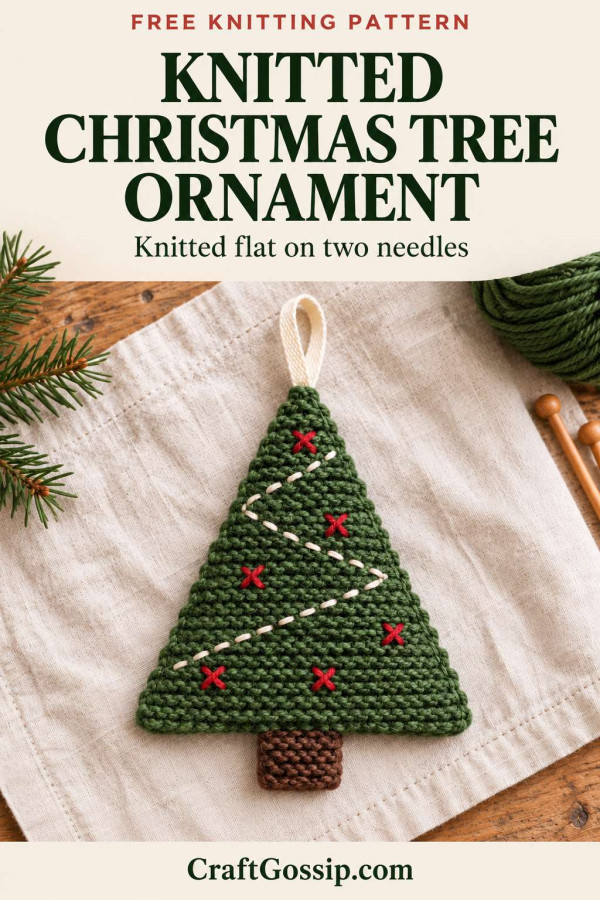
Free Christmas Tree Bauble Knitting Pattern: An Easy Ornament Knitted Flat

There’s something rather lovely about unpacking handmade Christmas decorations each year. They might be a little wonky, and someone has usually tangled the hanging loops, but they’re always the ones I want at the front of the tree.

This free Christmas tree bauble knitting pattern makes a softly stuffed, tree shaped ornament with a little brown trunk and embroidered decorations. It’s worked flat on two needles in garter stitch, so there’s no knitting in the round or juggling double-pointed needles.

You’ll knit two matching triangles, add a small trunk, then sew everything together. It’s a useful project for those leftover balls of green yarn that are too small for much else but apparently too precious to throw away.

Pattern Overview

  • Skill level: Confident beginner.
  • Construction: Two flat garter stitch panels, sewn together and lightly stuffed.
  • Finished size: Approximately 10 cm wide and 13 cm tall, including the trunk but excluding the hanging loop.
  • Techniques: Casting on, knitting, decreasing, casting off and simple sewing.
  • Terminology: Standard English knitting abbreviations.

Finished measurements are estimates and will vary with your yarn, tension and seam allowance.

Materials

  • Approximately 25–35 metres of green DK / 8-ply yarn.
  • Approximately 3 metres of brown DK / 8-ply yarn.
  • Small scraps of red, cream or gold yarn for embroidery.
  • A pair of 3.25 mm knitting needles, approximately US size 3.
  • A blunt-ended yarn needle.
  • A small amount of polyester toy stuffing.
  • Scissors.
  • Approximately 20 cm of narrow ribbon or strong yarn for the hanging loop.
  • A removable stitch marker or row counter, optional.

Choose smooth yarn so you can see the stitches easily. Smaller needles than you might normally use with DK yarn help create a firm fabric that keeps the stuffing tucked inside.

Tension

Approximately 24 stitches and 44 rows to 10 cm in garter stitch, measured flat without stretching.

Garter stitch means knitting every row. Two knitted rows form one garter ridge.

Exact tension is not essential for a decoration, but the fabric should be firm enough that stuffing does not show through. If your knitting looks loose, try smaller needles.

Abbreviations

  • K: Knit.
  • K2tog: Knit the next two stitches together. This decreases one stitch.
  • SSK: Slip one stitch knitwise, slip the next stitch knitwise, insert the left needle into the fronts of both slipped stitches and knit them together through the back loops. This decreases one stitch.
  • St / sts: Stitch / stitches.

Before You Start

Each tree panel begins at the wide bottom edge and narrows towards the tip.

Most shaping rows decrease two stitches, one near each edge. Three plain knit rows separate these shaping rows. The final decrease turns three stitches into one to finish the point.

Keep your cast-on edge relaxed. A tight cast-on can pull the bottom of the tree into a curve.

Christmas Tree Panels

Make two identical panels in green.

Cast on 25 stitches, leaving a 40 cm tail for sewing.

Rows 1–3: Knit all stitches. 25 sts

Row 4: K1, SSK, knit to the last 3 stitches, K2tog, K1. 23 sts

Rows 5–7: Knit all stitches.

Row 8: K1, SSK, knit to the last 3 stitches, K2tog, K1. 21 sts

Rows 9–11: Knit all stitches.

Row 12: K1, SSK, knit to the last 3 stitches, K2tog, K1. 19 sts

Rows 13–15: Knit all stitches.

Row 16: K1, SSK, knit to the last 3 stitches, K2tog, K1. 17 sts

Rows 17–19: Knit all stitches.

Row 20: K1, SSK, knit to the last 3 stitches, K2tog, K1. 15 sts

Rows 21–23: Knit all stitches.

Row 24: K1, SSK, knit to the last 3 stitches, K2tog, K1. 13 sts

Rows 25–27: Knit all stitches.

Row 28: K1, SSK, knit to the last 3 stitches, K2tog, K1. 11 sts

Rows 29–31: Knit all stitches.

Row 32: K1, SSK, knit to the last 3 stitches, K2tog, K1. 9 sts

Rows 33–35: Knit all stitches.

Row 36: K1, SSK, knit to the last 3 stitches, K2tog, K1. 7 sts

Rows 37–39: Knit all stitches.

Row 40: K1, SSK, knit to the last 3 stitches, K2tog, K1. 5 sts

Rows 41–43: Knit all stitches.

Row 44: K1, slip the next stitch knitwise, K2tog, then pass the slipped stitch over the stitch just worked, K1. 3 sts

Rows 45–47: Knit all stitches.

Row 48: Slip the first stitch knitwise, K2tog, then pass the slipped stitch over the stitch just worked. 1 st

Cut the yarn, leaving a 25 cm tail. Draw the tail through the remaining stitch and pull gently to secure.

Repeat for the second panel.

Stitch Count Check

After each shaping row, your counts should be:

23, 21, 19, 17, 15, 13, 11, 9, 7, 5, 3, 1.

If your count is wrong, correct it before continuing. A small ornament is considerably less forgiving than a roomy scarf.

Knitted Trunk

Make one in brown.

Cast on 5 stitches, leaving a 20 cm tail.

Rows 1–16: Knit all stitches.

Cast off, leaving another 20 cm tail.

Fold the strip in half so the cast-on and cast-off edges meet. This creates a double-layer trunk approximately 2 cm wide and 2 cm tall.

Sew the two side edges together. Leave the paired cast-on and cast-off edges available for attaching inside the tree.

The trunk does not need stuffing.

Decorate the Front

Decorate one tree panel before sewing the ornament together. Choose whichever face you prefer as the front.

Embroidered Baubles

Using red yarn, make five or six small cross stitches scattered over the panel.

For each bauble:

  1. Bring the needle up through a gap in the knitting.
  2. Make a short diagonal stitch.
  3. Cross it with another diagonal stitch to form a small X.
  4. Secure the yarn on the back without pulling the fabric tight.

Keep the embroidery approximately 1 cm away from the edges so it stays clear of the seams.

Optional Garland

Use cream or gold yarn to embroider a loose zigzag across the tree with short running stitches.

Avoid carrying one long, tight strand across the back. Leave a little slack between stitches so the panel stays flat.

You can decorate both panels if you want the ornament to look festive from either side.

Sew and Stuff the Tree Bauble

1. Prepare the Panels

Weave in any embroidery ends.

If the panels need tidying, lightly dampen them, gently arrange them into matching triangles and allow them to dry flat. Follow the care instructions for your yarn.

2. Position the Trunk

Place the back panel on the table with its outside facing down.

Centre the folded brown trunk along the bottom edge. Position its open edges approximately 5 mm inside the green panel, with the folded end extending below the tree.

Sew the open trunk edges securely to the inside of the back panel.

3. Add the Hanging Loop

Fold the ribbon or strong yarn in half.

Place both cut ends inside the tip of the tree, overlapping the green fabric by approximately 2 cm. Leave a loop extending above the point.

Sew the ends securely to the inside of the back panel with several small stitches. Check that the stitches do not show prominently on the outside.

4. Join the Panels

Place the front panel over the back panel, with the decorated faces pointing outwards.

Using green yarn, oversew through matching edge stitches:

  1. Begin at one bottom corner.
  2. Sew up the first sloping side.
  3. Sew carefully around the tip.
  4. Sew down the second sloping side.

Use small stitches and avoid pulling the seam tight enough to gather the edges.

5. Add the Stuffing

With the bottom edge still open, insert small wisps of stuffing.

Use the blunt end of your yarn needle to ease a little stuffing towards the tip. Add enough to give the tree a softly padded shape while keeping the outline flat.

Overstuffing will make the panels bulge and can reveal gaps between the stitches.

6. Close the Bottom

Sew across the bottom edge, catching both green panels and securing the trunk where it emerges.

Weave the yarn ends through the inside of the ornament, trim them and gently pat the stuffing into an even shape.

Give the hanging loop a gentle tug to check that it is securely attached.

Easy Colour Variations

  • Woodland tree: Olive green with cream embroidery and a brown trunk.
  • Traditional Christmas: Deep green with red baubles and a gold garland.
  • Frosted tree: Sage green with white embroidered stitches.
  • Scrap yarn tree: Alternate two green shades every two rows, using the same colour sequence for both panels.

For striped panels, carry the unused yarn loosely up the side and enclose it in the seam.

Troubleshooting

My panels are different sizes

Check that both have 48 rows and that you used the same needles. Make sure you have counted rows rather than garter ridges.

Light blocking can help with a small difference. A substantial difference usually means one panel has extra rows or a different tension.

Stuffing shows through

Remove some stuffing first. If the fabric itself is too open, use smaller needles for the next ornament.

The tree looks rounded instead of triangular

Use less stuffing and gently redistribute it towards the corners. This design should resemble a lightly padded triangle.

The bottom edge curves upwards

Your cast-on or sewing may be too tight. Loosen the bottom seam if necessary. For the next panel, cast on more loosely.

More Small Christmas Knitting Projects

If you’re making a collection of handmade decorations, these knitted mini mitten ornaments would make a sweet companion. For a different shape, take a look at these fancy knitted Christmas baubles.

Your finished tree also makes a lovely reusable gift topper. Thread the loop through the ribbon on a wrapped present, and the recipient gets a little decoration to keep after the paper has disappeared.

Categories

Afghans, Blankets, Throws baby hat Baby Patterns Beginner Book Reviews cardigans Christmas Craft News and Events Free Knitting Patterns Giveaways! Hats and Beanies Knit Knitting Patterns Knitting Technique & Tutorials mittens Quick Knits scarf shawl patterns socks Sweaters

RSS feed: More Articles More Articles

  • Free Christmas Tree Bauble Knitting Pattern: An Easy Ornament Knitted Flat
  • 8 No-Cook Keto Lunches for Days When the Stove Can Wait
  • Scandinavian Christmas Winter Lantern Review – A Beautiful Dollar Tree Craft with Cozy Nordic Charm
  • 15 Christmas Gifts You Can Sew in an Afternoon
  • Giant Coloring Pages for Kids and Adults: Free Printables, Posters and Classroom Ideas
  • Cozy Crochet Bauble – A Scrap-Busting Holiday Ornament
  • DIY Gift Tags Using Scrapbooking Supplies You Already Have
  • 5 Elegant Christmas Table Ideas Without Buying Flowers
  • Chaos at the Christmas Knit-Along: A Cosy Knitting Mystery to Watch
  • How To Make A Christmas Lace Bowl From An Old Doily

Pick Your Blog

  • Sewing
  • Knitting
  • Quilting
  • Crochet
  • Home & Garden
  • Recycled Crafts
  • Scrapbooking
  • Card Making
  • Polymer Clay
  • Cross-Stitch
  • Edible Crafts
  • Felting
  • Glass Art
  • Indie Crafts
  • Kids Crafts
  • Jewelry Making
  • Lesson Plans
  • Needlework
  • Bath & Body
  • Party Ideas
  • Candle Making
  • DIY Weddings
  • Not Craft
  • Free Craft Projects

Copyright © 2026 · CraftGossip | Start Here | Contact Us | Link to Us | Your Editors | Privacy and affiliate policy