• Home
  • Suggest A DIY
  • DIY Newsletter

Knitting

Free Patterns, Tutorials and Project Ideas

  • About CraftGossip
  • Our Network
    • Bath & Body Crafts
    • Candle Making Ideas
    • Crochet Ideas
    • Cross Stitch
    • Edible Crafts
    • Felting Patterns
    • Glass Art
    • Home & Garden Ideas
    • Indie Crafts
    • Jewelry Making
    • Kids Crafts
    • Knitting Patterns
    • Lesson Plans
    • Needlework
    • Party Ideas
    • Polymer Clay
    • Quilting Ideas
    • Recycled Crafts
    • Scrapbooking
    • Sewing Patterns
    • Card Making
    • DIY Weddings
    • Not Craft Ideas
  • Giveaways
  • Roundups
  • Store
  • Search

Giveaway: Mini Skein Knits

July 4, 2016 by Sarah White

mini skein knits

Congratulations to Duane!

First off, let me say that June was spectacularly crazy for me, but things will be getting better after this week. So if you’ve won a giveaway and haven’t received your prize yet, or you’re wondering why I haven’t picked a winner in a while, please be patient and I promise I will get caught up very soon. Thanks! You all are the best!

One of the last things I did while I was still working at About Knitting was an article all about mini skeins. These little skeins of yarn include a small yardage but are rather irresistible because they often come in great colors or allow you the chance to sample a little yarn you might not be able to afford in larger quantity.

But the trouble with mini skeins is that you might end up wanting to buy a lot of them and not knowing quite what to do with them. They’re lovely as yarn art, of course, but wouldn’t it be better to use them?

That’s where the book Mini Skein Knits comes in (I reviewed it as part of the article linked above). The book has 25 patterns for accessories and home projects (as well as two lovely striped sweaters) that will help you use up leftover yarn or mini skeins (you can see the projects on Ravelry). It’s a fun and colorful book that’s sure to inspire you to use up your little bits, and I’m giving away a copy this week.

If you’d like a chance to win it, leave a comment on this post by the end of the day Sunday, July 10. I’d love to know if you buy mini skeins or if this is the first you have heard of them. If you do, do you use them?

Thanks for visiting, commenting and sharing, and good luck!

Save
«
»

Comments

  1. Liz says

    July 4, 2016 at 10:40 am

    I have never bought these but have used oddments to make things in the past. Thank you for the giveaway chance

  2. Peggyann Huffman says

    July 4, 2016 at 10:51 am

    This has peaked my interest! What fun and what a different approach this would be.

  3. Amy McGlynn says

    July 4, 2016 at 10:56 am

    I love them! Mostly, I have used them for knitting toys. I would love to learn more ways to use up my leftovers, which are usually sock yarn.

  4. kim p says

    July 4, 2016 at 11:04 am

    This is new to me & sounds so fun

  5. Eileen says

    July 4, 2016 at 11:05 am

    Yes, I would buy them. When I knit dolls, you often use small amounts of different colors for clothes, etc. Would love to see a book with specific projects:)

  6. Margie says

    July 4, 2016 at 11:15 am

    I haven’t bought any mini-skeins but have done swaps with knitting friends so have quite a few in my stash; I also have those small partial skeins that multiply like bunnies but I rarely find projects in which to use them. This book would be a lifesaver!

  7. profsheehan says

    July 4, 2016 at 11:15 am

    I used to subscribe to a mini skein club (Koigu) and have used them all in a scarf or two.

  8. Anne Marie says

    July 4, 2016 at 11:18 am

    I have not bought mini-skeins for fear of becoming addicted!

  9. Andie D says

    July 4, 2016 at 11:19 am

    I love crafting with leftovers. This would be perfect! Thanks for the chance!

  10. Cassie says

    July 4, 2016 at 11:22 am

    I’ve been eyeing them but haven’t purchased any as I’m not quite sure what to do with them. I’d love to get a copy of this book and try them out.

  11. Peggy R says

    July 4, 2016 at 11:22 am

    I’ve never bought the mini skeins yet, because I haven’t found a use for them – until now! This book has peaked my interest, and has me re-thinking whether or not I’d be able to use a few of those skeins in some of my projects. Thank you for the great giveaway, and have a great 4th of July!!

  12. Laurie Hunt says

    July 4, 2016 at 11:32 am

    I have been intrigued by this book since it first came out. I have a couple of these mini sets that I’d like to use wisely. I would love to win this book.

  13. Sandy Michalik says

    July 4, 2016 at 11:32 am

    Other than using leftovers from my stash, I have not used them. I would love to use them in stranded mittens and
    hats.

  14. Your Friendly Home Economist says

    July 4, 2016 at 11:37 am

    I have seen the mini skeins in the store and didn’t know how to use them. This book is perfect! I love the multi-colored cowl and will add that to my list!

  15. Charlene says

    July 4, 2016 at 11:38 am

    I buy mini skeins first, then look for a project.

  16. Jean Bailey says

    July 4, 2016 at 11:51 am

    What a great way to use up all my leftovers yarn.

  17. Lennette Daniels says

    July 4, 2016 at 11:52 am

    I don’t mini skeins because I can never figure out what to make with them. But I do love the colors and the materials so I am always tempted. This book would answer my “What can I make with these” question.

  18. Bobbie Steyer says

    July 4, 2016 at 12:00 pm

    I’d love to try this!

  19. Martha says

    July 4, 2016 at 12:09 pm

    I have heard and seen mini skeins, but I have yet to succumb to the temptation.

  20. Helen King says

    July 4, 2016 at 12:35 pm

    I have not bought mini skeins yet as I have too much scrap yarn, but I will buy them when my supply depletes.

  21. Deborah Nelson says

    July 4, 2016 at 12:40 pm

    This would be great! I.have tones of yarn samples from Jimmie Bean ut never get them knit up!

  22. Frances Welden says

    July 4, 2016 at 12:42 pm

    Never tried them. Not sure if I have even seen them. But it would be fun to use them, I think.

  23. Cindy says

    July 4, 2016 at 12:45 pm

    I love having lots of mini skeins on hand.

  24. Ruth Bass says

    July 4, 2016 at 1:30 pm

    I haven’t heard of mini skeins. I would love to try! Thanks for a chance!

  25. Karey says

    July 4, 2016 at 1:58 pm

    Mini skeins are so cool! They let you try different yarns without having to buy a lot! Plus they are a great way to get lots of color in your project without having to buy a lot of yarn! I love working with mini skeins!

  26. Duane says

    July 4, 2016 at 2:01 pm

    Mini skeins are new to me. Seems like fun!

  27. Kitten With A Whiplash says

    July 4, 2016 at 2:14 pm

    I’ve seen them a lot in sets of 4 or 5, sometimes as gradient sets, and other times just a group of “complementary” colors The dyer and I seem to always disagree on one or more color in the set.

  28. Patty Manders says

    July 4, 2016 at 2:15 pm

    Mini skeins are like those little candy bars one buys at the grocery–a little treat of something sweet. I would love to see more ideas for using them.

    from sunny and bright VT,
    the Vermonster

  29. Georgine Hartenfels says

    July 4, 2016 at 2:27 pm

    There are also some great patterns for doll clothes using mini skeins.

  30. ROBIN Conrad says

    July 4, 2016 at 2:56 pm

    I have alot of small skeins and small bits of leftovers. This would be perfect to use these small bits.

  31. yolanda says

    July 4, 2016 at 3:29 pm

    I have not bought mini skeins before.
    I’ve seen lots that I love, but afraid to
    start buying… May not be able to stop…lol

  32. michele says

    July 4, 2016 at 4:49 pm

    Would love the chance to win this book. Hoping to find some great ideas for stash busting the mini skeins. :0)

  33. yarnsnobdownunder says

    July 4, 2016 at 5:11 pm

    I’ve just recently started buying mini-skeins – mostly for gradient projects (like shawls – they are my ‘thing’ 🙂 But I have some left-overs and was thinking of finally starting to learn fair-isle knitting so I could use those gorgeous complementary shades to knit hats, gloves and the yokes of sweaters. First though – I need to learn how! LOL I would love to have this book so I could get some more ideas and maybe even use up the mini-balls of left-over yarn from other projects that are just looking pretty in clear glass and plastic jars on my workspace right now. Thanks for the chance.

  34. Lee says

    July 4, 2016 at 5:33 pm

    I have never used mini skeins – I did not know about them! I would love to give them a try – thanks!

  35. knittingdancer says

    July 4, 2016 at 6:11 pm

    I have bought a couple set of mini skeins. I like to use them in knitting striped hats and cowls.

  36. Dina says

    July 4, 2016 at 6:20 pm

    I have bought mini skein sets because they’re often offered as gradients, which look great in all different kinds of projects

  37. Val Jensen says

    July 4, 2016 at 6:43 pm

    I have never heard of mini skeins before but it sounds like a wonderful idea and I would love the chance to try them. Thank you for offering me the chance to do so.

  38. Mary Helene says

    July 4, 2016 at 7:25 pm

    I have heard but never tried Mini Skeins before and would love to have this book.

  39. Margay says

    July 4, 2016 at 7:44 pm

    Heard of them but never used them before.

  40. Jeanne says

    July 4, 2016 at 9:21 pm

    I’ve never purchased mini-skeins, but I have been tempted… The one thing that has stopped me is my giant stash of yarn that is in both mini and maxi skeins ???? This book might help me with my continuing effort at stash busting.

  41. Kitty Oechler says

    July 4, 2016 at 9:45 pm

    I never heard of them

  42. Pauline says

    July 5, 2016 at 12:54 am

    I followed your link to ravelry to find a great surprise. I would actually knit and wear them all! I know, amazing right. I dont think that has ever happened to me before. If i dont win i will buy this book. So hello book shop, here i come ????

  43. Heidi Kirsch says

    July 5, 2016 at 1:35 am

    I’ve heard of mini skeins like LionBrand bonbons. And when you buy a kit. But in my life, mini skeins are all the leftover skeins from previous projects. This book looks purr…fect.

  44. Ofelia says

    July 5, 2016 at 2:20 am

    I’ve never used mini skeins, but there’s always a first time.
    Thank you for the giveaway.

  45. MelodyJ says

    July 5, 2016 at 3:38 am

    I have heard of mini skeins but have never bought or used them.

  46. Linda Rumsey says

    July 5, 2016 at 5:32 am

    I have never purchased mini skeins, but I do have a lot of oddments in need of a project or two!

  47. Dolores DeFrancesco says

    July 5, 2016 at 6:11 am

    I have bought mini’s for heels and toes on socks. Love the idea of projects made with mini skeins.

  48. Julie Ravelo says

    July 5, 2016 at 8:17 am

    Have bought mini skeins but haven’t known what to do with them. Would welcome ideas and patterns!

  49. Amanda Hutchens says

    July 5, 2016 at 9:06 am

    I’ve never used mini skeins before but I’d love the opportunity to try them. I think the patterns for using multiple colors like the hat are just gorgeous but purchasing full sized skeins for those types of patterns can become to costly and possibly wasteful.

  50. Judith (from Israel) says

    July 5, 2016 at 9:50 am

    This is the first I have heard of yard sold as mini skeins but I have many mini skeins of leftover yarn that my friends have given me. I use them to knit doll clothes.

Newer Comments »

Have you read?

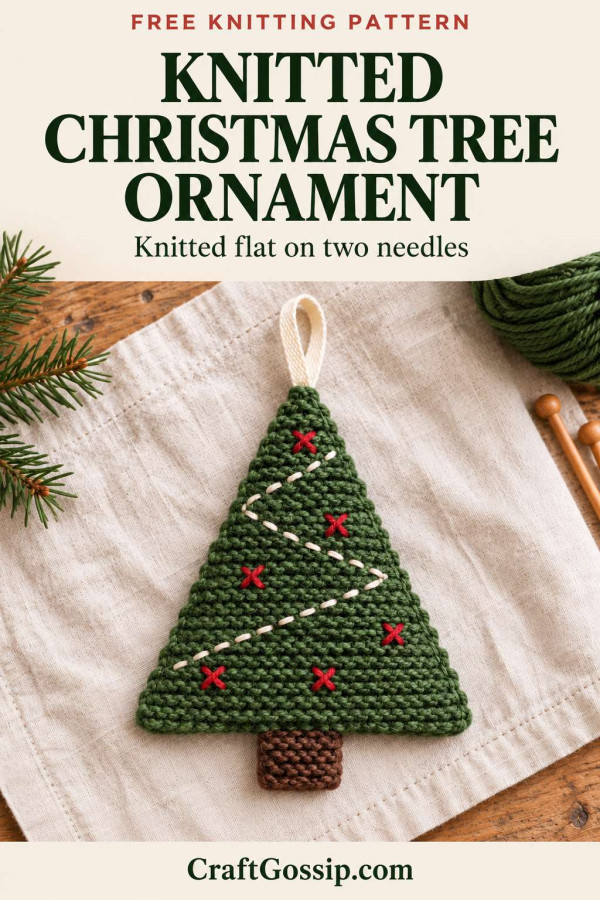
Free Christmas Tree Bauble Knitting Pattern: An Easy Ornament Knitted Flat

There’s something rather lovely about unpacking handmade Christmas decorations each year. They might be a little wonky, and someone has usually tangled the hanging loops, but they’re always the ones I want at the front of the tree.

This free Christmas tree bauble knitting pattern makes a softly stuffed, tree shaped ornament with a little brown trunk and embroidered decorations. It’s worked flat on two needles in garter stitch, so there’s no knitting in the round or juggling double-pointed needles.

You’ll knit two matching triangles, add a small trunk, then sew everything together. It’s a useful project for those leftover balls of green yarn that are too small for much else but apparently too precious to throw away.

Pattern Overview

  • Skill level: Confident beginner.
  • Construction: Two flat garter stitch panels, sewn together and lightly stuffed.
  • Finished size: Approximately 10 cm wide and 13 cm tall, including the trunk but excluding the hanging loop.
  • Techniques: Casting on, knitting, decreasing, casting off and simple sewing.
  • Terminology: Standard English knitting abbreviations.

Finished measurements are estimates and will vary with your yarn, tension and seam allowance.

Materials

  • Approximately 25–35 metres of green DK / 8-ply yarn.
  • Approximately 3 metres of brown DK / 8-ply yarn.
  • Small scraps of red, cream or gold yarn for embroidery.
  • A pair of 3.25 mm knitting needles, approximately US size 3.
  • A blunt-ended yarn needle.
  • A small amount of polyester toy stuffing.
  • Scissors.
  • Approximately 20 cm of narrow ribbon or strong yarn for the hanging loop.
  • A removable stitch marker or row counter, optional.

Choose smooth yarn so you can see the stitches easily. Smaller needles than you might normally use with DK yarn help create a firm fabric that keeps the stuffing tucked inside.

Tension

Approximately 24 stitches and 44 rows to 10 cm in garter stitch, measured flat without stretching.

Garter stitch means knitting every row. Two knitted rows form one garter ridge.

Exact tension is not essential for a decoration, but the fabric should be firm enough that stuffing does not show through. If your knitting looks loose, try smaller needles.

Abbreviations

  • K: Knit.
  • K2tog: Knit the next two stitches together. This decreases one stitch.
  • SSK: Slip one stitch knitwise, slip the next stitch knitwise, insert the left needle into the fronts of both slipped stitches and knit them together through the back loops. This decreases one stitch.
  • St / sts: Stitch / stitches.

Before You Start

Each tree panel begins at the wide bottom edge and narrows towards the tip.

Most shaping rows decrease two stitches, one near each edge. Three plain knit rows separate these shaping rows. The final decrease turns three stitches into one to finish the point.

Keep your cast-on edge relaxed. A tight cast-on can pull the bottom of the tree into a curve.

Christmas Tree Panels

Make two identical panels in green.

Cast on 25 stitches, leaving a 40 cm tail for sewing.

Rows 1–3: Knit all stitches. 25 sts

Row 4: K1, SSK, knit to the last 3 stitches, K2tog, K1. 23 sts

Rows 5–7: Knit all stitches.

Row 8: K1, SSK, knit to the last 3 stitches, K2tog, K1. 21 sts

Rows 9–11: Knit all stitches.

Row 12: K1, SSK, knit to the last 3 stitches, K2tog, K1. 19 sts

Rows 13–15: Knit all stitches.

Row 16: K1, SSK, knit to the last 3 stitches, K2tog, K1. 17 sts

Rows 17–19: Knit all stitches.

Row 20: K1, SSK, knit to the last 3 stitches, K2tog, K1. 15 sts

Rows 21–23: Knit all stitches.

Row 24: K1, SSK, knit to the last 3 stitches, K2tog, K1. 13 sts

Rows 25–27: Knit all stitches.

Row 28: K1, SSK, knit to the last 3 stitches, K2tog, K1. 11 sts

Rows 29–31: Knit all stitches.

Row 32: K1, SSK, knit to the last 3 stitches, K2tog, K1. 9 sts

Rows 33–35: Knit all stitches.

Row 36: K1, SSK, knit to the last 3 stitches, K2tog, K1. 7 sts

Rows 37–39: Knit all stitches.

Row 40: K1, SSK, knit to the last 3 stitches, K2tog, K1. 5 sts

Rows 41–43: Knit all stitches.

Row 44: K1, slip the next stitch knitwise, K2tog, then pass the slipped stitch over the stitch just worked, K1. 3 sts

Rows 45–47: Knit all stitches.

Row 48: Slip the first stitch knitwise, K2tog, then pass the slipped stitch over the stitch just worked. 1 st

Cut the yarn, leaving a 25 cm tail. Draw the tail through the remaining stitch and pull gently to secure.

Repeat for the second panel.

Stitch Count Check

After each shaping row, your counts should be:

23, 21, 19, 17, 15, 13, 11, 9, 7, 5, 3, 1.

If your count is wrong, correct it before continuing. A small ornament is considerably less forgiving than a roomy scarf.

Knitted Trunk

Make one in brown.

Cast on 5 stitches, leaving a 20 cm tail.

Rows 1–16: Knit all stitches.

Cast off, leaving another 20 cm tail.

Fold the strip in half so the cast-on and cast-off edges meet. This creates a double-layer trunk approximately 2 cm wide and 2 cm tall.

Sew the two side edges together. Leave the paired cast-on and cast-off edges available for attaching inside the tree.

The trunk does not need stuffing.

Decorate the Front

Decorate one tree panel before sewing the ornament together. Choose whichever face you prefer as the front.

Embroidered Baubles

Using red yarn, make five or six small cross stitches scattered over the panel.

For each bauble:

  1. Bring the needle up through a gap in the knitting.
  2. Make a short diagonal stitch.
  3. Cross it with another diagonal stitch to form a small X.
  4. Secure the yarn on the back without pulling the fabric tight.

Keep the embroidery approximately 1 cm away from the edges so it stays clear of the seams.

Optional Garland

Use cream or gold yarn to embroider a loose zigzag across the tree with short running stitches.

Avoid carrying one long, tight strand across the back. Leave a little slack between stitches so the panel stays flat.

You can decorate both panels if you want the ornament to look festive from either side.

Sew and Stuff the Tree Bauble

1. Prepare the Panels

Weave in any embroidery ends.

If the panels need tidying, lightly dampen them, gently arrange them into matching triangles and allow them to dry flat. Follow the care instructions for your yarn.

2. Position the Trunk

Place the back panel on the table with its outside facing down.

Centre the folded brown trunk along the bottom edge. Position its open edges approximately 5 mm inside the green panel, with the folded end extending below the tree.

Sew the open trunk edges securely to the inside of the back panel.

3. Add the Hanging Loop

Fold the ribbon or strong yarn in half.

Place both cut ends inside the tip of the tree, overlapping the green fabric by approximately 2 cm. Leave a loop extending above the point.

Sew the ends securely to the inside of the back panel with several small stitches. Check that the stitches do not show prominently on the outside.

4. Join the Panels

Place the front panel over the back panel, with the decorated faces pointing outwards.

Using green yarn, oversew through matching edge stitches:

  1. Begin at one bottom corner.
  2. Sew up the first sloping side.
  3. Sew carefully around the tip.
  4. Sew down the second sloping side.

Use small stitches and avoid pulling the seam tight enough to gather the edges.

5. Add the Stuffing

With the bottom edge still open, insert small wisps of stuffing.

Use the blunt end of your yarn needle to ease a little stuffing towards the tip. Add enough to give the tree a softly padded shape while keeping the outline flat.

Overstuffing will make the panels bulge and can reveal gaps between the stitches.

6. Close the Bottom

Sew across the bottom edge, catching both green panels and securing the trunk where it emerges.

Weave the yarn ends through the inside of the ornament, trim them and gently pat the stuffing into an even shape.

Give the hanging loop a gentle tug to check that it is securely attached.

Easy Colour Variations

  • Woodland tree: Olive green with cream embroidery and a brown trunk.
  • Traditional Christmas: Deep green with red baubles and a gold garland.
  • Frosted tree: Sage green with white embroidered stitches.
  • Scrap yarn tree: Alternate two green shades every two rows, using the same colour sequence for both panels.

For striped panels, carry the unused yarn loosely up the side and enclose it in the seam.

Troubleshooting

My panels are different sizes

Check that both have 48 rows and that you used the same needles. Make sure you have counted rows rather than garter ridges.

Light blocking can help with a small difference. A substantial difference usually means one panel has extra rows or a different tension.

Stuffing shows through

Remove some stuffing first. If the fabric itself is too open, use smaller needles for the next ornament.

The tree looks rounded instead of triangular

Use less stuffing and gently redistribute it towards the corners. This design should resemble a lightly padded triangle.

The bottom edge curves upwards

Your cast-on or sewing may be too tight. Loosen the bottom seam if necessary. For the next panel, cast on more loosely.

More Small Christmas Knitting Projects

If you’re making a collection of handmade decorations, these knitted mini mitten ornaments would make a sweet companion. For a different shape, take a look at these fancy knitted Christmas baubles.

Your finished tree also makes a lovely reusable gift topper. Thread the loop through the ribbon on a wrapped present, and the recipient gets a little decoration to keep after the paper has disappeared.

Categories

Afghans, Blankets, Throws baby hat Baby Patterns Beginner Book Reviews cardigans Christmas Craft News and Events Free Knitting Patterns Giveaways! Hats and Beanies Knit Knitting Patterns Knitting Technique & Tutorials mittens Quick Knits scarf shawl patterns socks Sweaters

RSS feed: More Articles More Articles

  • Free Christmas Tree Bauble Knitting Pattern: An Easy Ornament Knitted Flat
  • 8 No-Cook Keto Lunches for Days When the Stove Can Wait
  • Scandinavian Christmas Winter Lantern Review – A Beautiful Dollar Tree Craft with Cozy Nordic Charm
  • 15 Christmas Gifts You Can Sew in an Afternoon
  • Giant Coloring Pages for Kids and Adults: Free Printables, Posters and Classroom Ideas
  • Cozy Crochet Bauble – A Scrap-Busting Holiday Ornament
  • DIY Gift Tags Using Scrapbooking Supplies You Already Have
  • 5 Elegant Christmas Table Ideas Without Buying Flowers
  • Chaos at the Christmas Knit-Along: A Cosy Knitting Mystery to Watch
  • How To Make A Christmas Lace Bowl From An Old Doily

Pick Your Blog

  • Sewing
  • Knitting
  • Quilting
  • Crochet
  • Home & Garden
  • Recycled Crafts
  • Scrapbooking
  • Card Making
  • Polymer Clay
  • Cross-Stitch
  • Edible Crafts
  • Felting
  • Glass Art
  • Indie Crafts
  • Kids Crafts
  • Jewelry Making
  • Lesson Plans
  • Needlework
  • Bath & Body
  • Party Ideas
  • Candle Making
  • DIY Weddings
  • Not Craft
  • Free Craft Projects

Copyright © 2026 · CraftGossip | Start Here | Contact Us | Link to Us | Your Editors | Privacy and affiliate policy