• Home
  • Suggest A DIY
  • DIY Newsletter

Knitting

Free Patterns, Tutorials and Project Ideas

  • About CraftGossip
  • Our Network
    • Bath & Body Crafts
    • Candle Making Ideas
    • Crochet Ideas
    • Cross Stitch
    • Edible Crafts
    • Felting Patterns
    • Glass Art
    • Home & Garden Ideas
    • Indie Crafts
    • Jewelry Making
    • Kids Crafts
    • Knitting Patterns
    • Lesson Plans
    • Needlework
    • Party Ideas
    • Polymer Clay
    • Quilting Ideas
    • Recycled Crafts
    • Scrapbooking
    • Sewing Patterns
    • Card Making
    • DIY Weddings
    • Not Craft Ideas
  • Giveaways
  • Roundups
  • Store
  • Search

Giveaway: Yarn to Knit a Cowl from the Yarnspirations Lookbook

October 27, 2014 by Sarah White

Win the yarn to knit your own Strand-Tastic Cowl from Yarnspirations!

Congratulations to Frank George!

When Yarnspirations contacted me about featuring their fall lookbook (which I was totally going to do anyway, because I love it) I threw out the suggestion that we could do a giveaway with the yarn from one of the patterns.

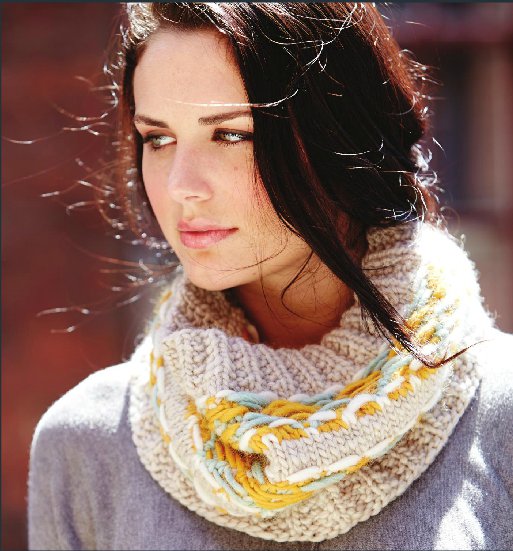
Because I’m a big fan of gifting what you would like to receive, I picked the Strand-Tastic Cowl, a cute and easy cowl worked with stranded colorwork where the strands are actually on the outside of the work as you wear it.

I like the look of a project like this but have never actually done it myself. Maybe thinking about this project will finally inspire me to try it on my own.

The giveaway this week, then is four balls of Classic Wool Roving, one each in natural, yellow, aran and low tide. It won’t hurt my feelings if you knit something else with them, but I think they’re lovely in this cowl.

If you want a chance to win these, leave a comment on this post before the end of the day Sunday, November 2. (What is it doing being almost November already?)

Why don’t you tell me what you would knit with this yarn if you weren’t going to make the cowl, or who you would make it for if you were. (I would keep it for myself.)

Thanks for visiting, commenting and sharing, and good luck!

{Photo via Yarnspirations.}

Looking to buy your Yarn online? Check out these online yarn specials.

Specific to knitters, you can join our Knitting Patterns Only group to get, well, knitting patterns, ask questions and gain inspiration for what to knit next.

Check out these books dedicated to Knitted Cowl Patterns still looking for more cowl patterns? Check these out on Etsy.

Next Pattern:

  • Download Yarnspirations Patterns to Help Charity
  • Sock Yarn Cowl Knitting Patterns
  • How Do You Put Yarn in a Yarn Holder?
«
»

Comments

  1. Mommar6 says

    October 28, 2014 at 9:40 am

    I would love to knit the cowl for a daughter.

  2. Rema Addrayie says

    October 28, 2014 at 9:45 am

    I would make the cowl for myself. It’s beautiful and the colors are too. It would be fun to learn this technique and show that the WS of a work can be just as beautiful as the RS.

  3. Hilary Davison says

    October 28, 2014 at 9:46 am

    I love these smaller projects, gets them finished in time to move on to something else and to giveaway for those impromptu presents.

  4. Karen Annette Jernigan says

    October 28, 2014 at 9:47 am

    I would knit this cowl for my sister or maybe one for a friend.

  5. Jeannie bennett says

    October 28, 2014 at 9:52 am

    I would knit the cowl, looks neat!

  6. thelogicalcat says

    October 28, 2014 at 9:58 am

    Lovely cowl! I would love to make it as a gift, but I would probably end up keeping it for myself.

  7. ladybugsyjane says

    October 28, 2014 at 9:59 am

    Oh, what wonderful colors! I’m always looking toward knitting bulky, but somehow never do, this would be an awesome way to accomplish that!

  8. jodi says

    October 28, 2014 at 10:01 am

    Would love to make one.

  9. Connie L. says

    October 28, 2014 at 10:04 am

    Love the cowl. I’d make it for my mom!

  10. Joyce Demmitt says

    October 28, 2014 at 10:05 am

    Cool technique. This cowl would be a fun addition to colorwork classes.

  11. Jennifer Reynolds says

    October 28, 2014 at 10:07 am

    The cowl is so pretty! I could try it!

  12. Amanda Langworthy says

    October 28, 2014 at 10:12 am

    I would probably make the cowl..but for someone else. I hardly ever make something for myself. Thanks for the giveaway!

  13. Kathy West says

    October 28, 2014 at 10:16 am

    Wow, great pattern and colors! I would love to win and learn how to do this, then show off my new cowl.

  14. Patricia @ Pops de Milk says

    October 28, 2014 at 10:16 am

    The cowl looks gorgeous so I would definitely knit that and I think I’d keep it for myself – I’m still a beginner knitter so this would be great practice/incentive for me 🙂

  15. Lisa Mitchell says

    October 28, 2014 at 10:22 am

    I love making cowls but unfortunately I never get to keep one as I give it to a family member ????. This one would be for me! Lol

  16. Nancy says

    October 28, 2014 at 10:34 am

    I think the cowl looks really great. I make gifts for girls in a transition home for Christmas and I think they would love this.

  17. Jane R says

    October 28, 2014 at 10:35 am

    I would knit the cowl and give it to one of my daughters for Christmas!

  18. Roberta says

    October 28, 2014 at 10:48 am

    I have not made a cowl yet. But it could be useful with the cold weather coming.

  19. Diana Tulloch says

    October 28, 2014 at 10:49 am

    I’d love to try the cowl, it’s pretty.

  20. kaleasfe says

    October 28, 2014 at 10:55 am

    The cowl is a good idea, but a really need a new hat… 🙂

  21. Joani says

    October 28, 2014 at 10:59 am

    I would make the cowl for my sister.

  22. Cheryl says

    October 28, 2014 at 11:01 am

    I would make this cowl for myself! It is beautiful.

  23. Carole Olson says

    October 28, 2014 at 11:07 am

    Lovely design

  24. Amanda Edwards says

    October 28, 2014 at 11:10 am

    I would make the cowl for myself or as a gift for my sister. I am interested to see what the WS looks like as well. Could wear it both ways!!!!

  25. Kelly Elkins says

    October 28, 2014 at 11:12 am

    I am not sure I would make this cowl – but probably a cowl as a Christmas gift. Love the yarn!

  26. Janay Thornton Oliver says

    October 28, 2014 at 11:16 am

    I’d give it to my almost 13 yr old, she’s working on knitting projects!

  27. christiana says

    October 28, 2014 at 11:19 am

    I think its cute I would make it for my mother she loves everything I make and treats it like gold. 🙂

  28. Michele Timms says

    October 28, 2014 at 11:23 am

    If I won I would definitely make this cowl – it is perfect!!

  29. Turid says

    October 28, 2014 at 11:28 am

    I would like to make the cowl. It’s freezing here…

  30. Sharon Fee says

    October 28, 2014 at 11:33 am

    I love the different stitches used in this cowl and the way the colors show on the outside. I would definitely knit this cowl and of course, I would keep it for myself! 🙂

  31. Kathy Wigington says

    October 28, 2014 at 11:47 am

    I would love to try the yarn on something!

  32. Siobhan says

    October 28, 2014 at 11:48 am

    think I would use it to make a mitten and hat set for my daughter. It’s getting cold out and she walks to school.
    But the cowl is made in a technic I’ve never heard of before so it would be something I might try down the road with different yarns maybe.

  33. amchart says

    October 28, 2014 at 11:50 am

    I’ve been on a cowl kick for a while and am well-stocked for winter. The yarn might be used for mittens for my kids.

  34. Jo says

    October 28, 2014 at 11:55 am

    I don’t usually keep the things I make, I love making for my family!

  35. leslie says

    October 28, 2014 at 11:58 am

    very nice cowl

  36. Suzanne Zaleski says

    October 28, 2014 at 12:03 pm

    I wonder if this would be easy or difficult for a beginner? I’d like to learn to knit this winter and this looks like a good project.

  37. Conie K. says

    October 28, 2014 at 12:04 pm

    Probably the cowl – but if no one was interested in receiving it as a gift – I might make a nice felted pillow for my craft room.

  38. Nangy says

    October 28, 2014 at 12:10 pm

    I would make the cowl,looks quick and it would be the perfect gift for my mama!!.Gotta get going on Christmas gifts!!!

  39. Merry says

    October 28, 2014 at 12:16 pm

    While the cowl is interesting, I don’t need any help with keeping my body warm these days so would probably knit slippers. : )
    wahoomerryf on Ravelry

  40. Cathy says

    October 28, 2014 at 12:31 pm

    I would make it for one of my girls they would love it

  41. Patsy Coats says

    October 28, 2014 at 12:37 pm

    I would knit it for my niece.

  42. Renee Erez says

    October 28, 2014 at 12:38 pm

    I love that cowl – and the colors are just yummy.

  43. Karen says

    October 28, 2014 at 12:39 pm

    I would try the cowl and give it to my sister since she’ll probably have to help me with it!

  44. Andrea Wilson says

    October 28, 2014 at 12:40 pm

    I love this colouway! I would knit this cowl with the original intention of giving it as a gift for Christmas, and then fall in love while I was knitting it and become weakened and wear it myself 🙂

  45. Joan says

    October 28, 2014 at 12:46 pm

    I would love to have the opportunity to knit this cowl to keep my mother warm when she is taken outside in her wheelchair this winter.

  46. Lennette Daniels says

    October 28, 2014 at 12:54 pm

    I love that cowl. I think I would make it for myself.

  47. Edna F. says

    October 28, 2014 at 12:58 pm

    I think I might actually make the cowl. I do know that it scrams Christmas present, though!

  48. Kristin Colligan says

    October 28, 2014 at 12:58 pm

    If I won this yarn, I would immediately go to my friends house to learn how to knit it for myself

  49. Agnes Kis says

    October 28, 2014 at 1:04 pm

    Love the cowl, would make it for my daughter and myself too 🙂

  50. RONDA SIMON says

    October 28, 2014 at 1:05 pm

    I JUST LOVE THE COLORS AND STITCHES ON THIS COWL…SO BEAUTIFUL ON THE MODEL…AND HOPE IT WILL LOOK HALF AS PRETTY ON ME….THANK YOU FOR THE CHANCE! HAPPY FALL!

« Older Comments
Newer Comments »

Have you read?

How To Do Kitchener Stitch: A Beginner-Friendly Guide To Grafting Knitting Seamlessly

Kitchener stitch is one of those knitting techniques that feels a little bit mysterious until you finally sit down and do it. It is often used to close the toes of socks, but it is also a wonderfully neat way to join two sets of live stitches together without making a bulky seam.

If you have ever finished a beautiful sock and then paused at the toe because the pattern says “graft remaining stitches,” this is the tutorial you want to keep handy.

Kitchener stitch, also called grafting, creates a row of stitches between two pieces of knitting so the join looks almost invisible. Instead of binding off and sewing two edges together, you use a tapestry needle and yarn to form a new row of knitting between the live stitches.

It is one of the most useful finishing techniques for knitters, especially if you enjoy knitting socks, mittens, cowls, loop scarves, or garments where a smooth join matters.

You might also like this older CraftGossip post on grafting with Kitchener stitch, and if you want to go deeper into finishing techniques, this post on mastering grafting in knitting is another helpful read.

What Is Kitchener Stitch?

Kitchener stitch is a method of grafting two sets of live stitches together. The stitches stay on two needles, usually held parallel to each other, and you use a threaded tapestry needle to work through the stitches in a specific order.

When done well, the finished join looks like one continuous piece of knitting.

This is why Kitchener stitch is so popular for:

  • sock toes
  • mitten tips
  • shoulder joins
  • cowls
  • loop scarves
  • seamless tube projects
  • underarm stitches on some sweaters
  • small knitted bags and pouches

It is most commonly used on stockinette stitch, but grafting can also be adapted for other stitch patterns once you understand the basic idea.

Why Use Kitchener Stitch Instead Of Sewing A Seam?

The biggest benefit of Kitchener stitch is that it creates a smooth, almost invisible join. That matters most in places where you do not want a bulky seam, such as the toe of a sock.

A sewn seam across a sock toe can feel uncomfortable inside a shoe. Kitchener stitch avoids that by creating a flat, flexible finish.

It also gives knitted items a more polished look. If you are making gifts, charity knits, socks, or heirloom-style projects, learning this one technique can make your finished pieces look much neater.

For knitters who enjoy socks, you may also like this roundup of knitting patterns using sock yarn, especially if you have leftover yarn after finishing a pair.

Supplies You Need

To work Kitchener stitch, you will need:

  • two knitting needles holding live stitches
  • a tapestry needle or darning needle
  • yarn tail or matching yarn
  • scissors
  • good lighting
  • a little patience the first time

If you are working sock toes, most patterns will tell you how many stitches to leave on each needle before grafting.

As a general guide, leave a yarn tail at least three times the width of the stitches you are grafting. If you are unsure, leave a little extra. It is much easier to weave in a longer tail than to run out halfway across.

A blunt-tip tapestry needle is easier to control than a sharp sewing needle because it slides between yarn strands without splitting them as much. You can find tapestry needles, sock knitting tools, stitch markers, and finishing supplies through places such as Amazon, Mary Maxim, or your favorite local yarn store.

Before You Start: Set Up Your Stitches

For standard Kitchener stitch on stockinette:

Hold the two needles parallel, with the wrong sides of the knitting facing each other.

The right side of the knitting should be facing out.

The needle closest to you is the front needle.

The needle farther away from you is the back needle.

Thread your yarn tail onto a tapestry needle.

Try to keep the stitches sitting neatly on the needles and avoid twisting them before you begin.

The Kitchener Stitch Mantra

Many knitters remember Kitchener stitch with this little rhythm:

Front needle: knit off, purl on.
Back needle: purl off, knit on.

That means:

On the front needle, go into the first stitch knitwise and take it off. Then go into the next stitch purlwise and leave it on.

On the back needle, go into the first stitch purlwise and take it off. Then go into the next stitch knitwise and leave it on.

Once you get into the rhythm, it becomes much less intimidating.

Kitchener Stitch Step-By-Step

Setup Step 1

Insert the tapestry needle into the first stitch on the front needle as if to purl.

Pull the yarn through.

Leave the stitch on the knitting needle.

Setup Step 2

Insert the tapestry needle into the first stitch on the back needle as if to knit.

Pull the yarn through.

Leave the stitch on the knitting needle.

Now you are ready to begin the repeating sequence.

Step 1: Front Needle, Knitwise, Off

Insert the tapestry needle into the first stitch on the front needle as if to knit.

Pull the yarn through.

Slip that stitch off the knitting needle.

Step 2: Front Needle, Purlwise, On

Insert the tapestry needle into the next stitch on the front needle as if to purl.

Pull the yarn through.

Leave that stitch on the knitting needle.

Step 3: Back Needle, Purlwise, Off

Insert the tapestry needle into the first stitch on the back needle as if to purl.

Pull the yarn through.

Slip that stitch off the knitting needle.

Step 4: Back Needle, Knitwise, On

Insert the tapestry needle into the next stitch on the back needle as if to knit.

Pull the yarn through.

Leave that stitch on the knitting needle.

Repeat these four steps until all stitches have been grafted.

A Simple Way To Remember It

Say this out loud as you work:

Knit off, purl on.
Purl off, knit on.

It feels silly the first few times, but it works. Many knitters mutter this little phrase while closing sock toes, and honestly, anything that helps you avoid losing your place is worth doing.

How Tight Should Kitchener Stitch Be?

One of the most common mistakes with Kitchener stitch is pulling the yarn too tightly.

You are not sewing a seam closed. You are creating a new row of knitting.

After every few stitches, gently adjust the tension so the grafted row matches the surrounding stitches. If you pull too tightly, the join may pucker. If you leave it too loose, the grafted row may look stretched out.

A good trick is to look at the stitches beside the graft and try to match their size.

Do not panic if it looks a little uneven while it is still on the needles. Kitchener stitch often looks better once everything is off the needles and the tension has been gently adjusted.

How To Finish The Last Stitches

When you get to the final stitches, continue the sequence as closely as possible.

If there is only one stitch left on a needle, work the “off” part of the sequence for that stitch.

Pull the yarn through gently and then weave the tail into the inside or wrong side of the project.

For socks, weave the end into the inside of the toe so it will not be visible.

Troubleshooting Kitchener Stitch

My graft looks too tight

You probably pulled the yarn too firmly as you worked. Use the tip of your tapestry needle to gently loosen each grafted stitch, working from one side to the other.

My graft looks loose

Gently snug up the grafted stitches one at a time. Do not yank the working yarn all at once, as this can make one area tight and another loose.

I lost my place

Pause and look at the stitches. If the last stitch was removed from the front needle, you are probably ready to work the “purl on” part on the front needle or move to the back needle. If you are a beginner, it helps to say the mantra out loud every single time.

I split the yarn

A blunt tapestry needle helps prevent splitting. If a stitch looks split and messy, carefully undo that part before continuing.

The join looks like a seam, not a row of knitting

This usually means the tension is too tight or the needle was inserted in the wrong direction on some stitches. Practice on a swatch before using Kitchener stitch on a special project.

Practice Before Grafting A Real Project

If Kitchener stitch makes you nervous, knit two small stockinette swatches and place the live stitches on two needles. Use a contrasting yarn to practice grafting across the stitches.

Practicing with a different color makes it easier to see what the grafted row is doing. Once you understand the movement, try again with matching yarn.

This is especially useful before grafting handmade socks, because sock toes are small and can feel fiddly the first few times.

When Else Can You Use Kitchener Stitch?

Kitchener stitch is most famous for sock toes, but it is helpful in many other knitting projects.

Use it for joining the ends of a cowl or loop scarf, especially when you start with a provisional cast on. This CraftGossip post on making loop scarves from stash yarn mentions using a provisional cast on so the ends can be grafted together neatly.

You can also use Kitchener stitch for small bags, seamless headbands, mitten tips, and some garment joins.

If you are brushing up on knitting basics, this post on favorite ways to cast on is a good companion read, especially if you are learning how different beginnings and endings affect the finish of a project.

Kitchener Stitch For Sock Knitters

If you knit socks from the cuff down, Kitchener stitch is one of the most useful finishing techniques you can learn.

Most cuff-down sock patterns end with a small number of stitches divided between two needles. Kitchener stitch closes those stitches without creating a ridge across the toe.

For a comfortable sock toe:

Keep the stitches evenly divided.

Do not pull the graft too tightly.

Check that the toe lies flat before weaving in the end.

Use matching yarn whenever possible.

Once the sock is finished, blocking can also help smooth the stitches and even out the graft.

If you enjoy knitting small accessories, you might also like these easy headband knitting patterns, which are great projects for practicing finishing techniques on something smaller than a sweater.

Kitchener stitch has a reputation for being tricky, but it is really just a short sequence repeated across two needles. Once you remember the rhythm — knit off, purl on, purl off, knit on — it becomes much easier.

The real secret is to slow down, keep your tension relaxed, and remember that you are creating a row of knitting, not stitching a seam shut.

It may not feel natural the first time, but after a few sock toes or practice swatches, Kitchener stitch becomes one of those finishing skills you will be glad to have in your knitting toolkit.

Categories

baby hat Baby Patterns Beginner Book Reviews cardigan Christmas CraftGossip Giveaways Craft News and Events Free Knitting Patterns Giveaways! Hats Knitting Articles Of Interest Knitting Patterns Knitting Technique & Ideas mittens Quick scarf shawl patterns socks Sweaters

Featured Posts

cotton clouds birthday sale

Birthday Surprises from Cotton Clouds

win a copy of pop knitting

Giveaway: Pop Knitting

Vintage Modern Knits by Interweave….

The Meaning of Knitting

Knit a simple scarf for a fashion doll.

Knit a Simple Scarf for Barbie

RSS More Articles

  • Cross Stitch Ice Cream and Frozen Treats
  • 15 Charity Sewing Projects That Let You Sew Something Useful For A Good Cause
  • Sunflower Ribbon Embroidery Tutorials and Kits to Brighten Your Hoop
  • Decorating Mistakes That Make Your Living Room Feel Cluttered
  • Remembering Jill Smokler, Founder Of Scary Mommy
  • In the Garden Layer Cake – A Bloom-Filled Fabric Collection for Spring Sewing
  • How To Do Kitchener Stitch: A Beginner-Friendly Guide To Grafting Knitting Seamlessly
  • Pattern Review: Georgie Granny Square Bucket Hat Crochet Pattern
  • 12 Handmade Patriotic 4th of July Card Ideas
  • Shark Week Learning for Kids

Pick Your Blog

  • Sewing
  • Knitting
  • Quilting
  • Crochet
  • Home & Garden
  • Recycled Crafts
  • Scrapbooking
  • Card Making
  • Polymer Clay
  • Cross-Stitch
  • Edible Crafts
  • Felting
  • Glass Art
  • Indie Crafts
  • Kids Crafts
  • Jewelry Making
  • Lesson Plans
  • Needlework
  • Bath & Body
  • Party Ideas
  • Candle Making
  • DIY Weddings
  • Not Craft
  • Free Craft Projects

Copyright © 2026 · CraftGossip | Start Here | Contact Us | Link to Us | Your Editors | Privacy and affiliate policy