• Home
  • Suggest A DIY
  • DIY Newsletter

Knitting

Free Patterns, Tutorials and Project Ideas

  • About CraftGossip
  • Our Network
    • Bath & Body Crafts
    • Candle Making Ideas
    • Crochet Ideas
    • Cross Stitch
    • Edible Crafts
    • Felting Patterns
    • Glass Art
    • Home & Garden Ideas
    • Indie Crafts
    • Jewelry Making
    • Kids Crafts
    • Knitting Patterns
    • Lesson Plans
    • Needlework
    • Party Ideas
    • Polymer Clay
    • Quilting Ideas
    • Recycled Crafts
    • Scrapbooking
    • Sewing Patterns
    • Card Making
    • DIY Weddings
    • Not Craft Ideas
  • Giveaways
  • Roundups
  • Store
  • Search

How to Seam Garter Stitch

March 6, 2026 by Sarah White

Garter stitch is an unsung (by many people) workhorse of knitting. It’s so easy to knit and quite meditative, and I love the chunky texture of the waves of garter stitch ridges. 

But just because it’s easy doesn’t mean everything about it is simple. 

Take knitting in the round, for instance. When you knit every stitch of every row flat, you get garter stitch, but knit every stitch of every round in the round? Stockinette stitch. 

To make garter stitch when knitting in the round, you have to knit a round and purl a round. Most knitters like to work in the round to avoid purling, so this isn’t a great option. 

(It is possible, though. I did this on a big cowl I knit many years ago.)

In addition to the purling being annoying, it’s also not ideal because switching between knits and purls at the beginning of each round makes a jog, much like the jog you get when you change colors knitting in the round. This little blip almost looks like a seam. 

So why not just knit a project flat and seam it? That eliminates the problem of having to purl, and at least theoretically your sewn seam could be less visible than the faux seam of a project worked in rounds. 

I say theoretically because I feel like people don’t learn how to seam garter stitch as regularly as we teach mattress stitch. Maybe that has to do with people abandoning garter stitch as soon as they learn how to purl? I don’t know. 

Seaming garter stitch seems like it might be more difficult, too, because you don’t have those neat little vs to work into. But it’s not difficult once you know what you need to do. 

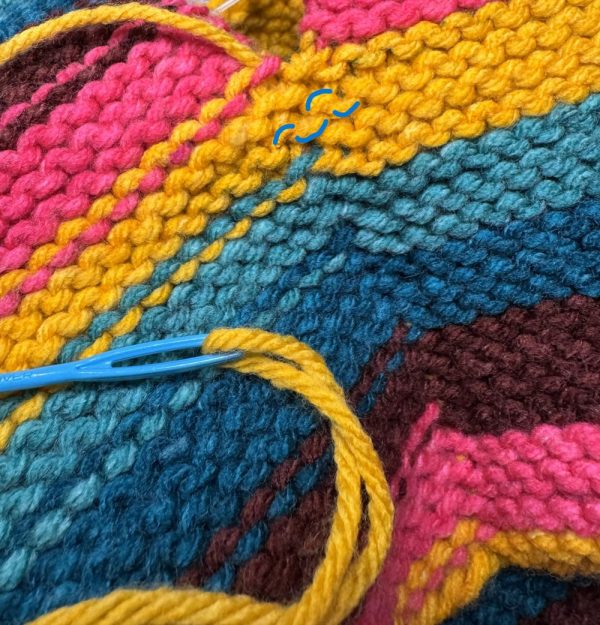
I broke it all down in this tutorial about how to seam garter stitch. Because I used multicolored yarn the seam is more visible than it would be in a solid color, but that lets you see exactly what’s happening. And once you know what you’re doing you’ll have unlocked a whole new world of options for knitting garter stitch. 

Do you love garter stitch as much as I do or do you tend to avoid it? I’d love to hear your thoughts. And check out some garter stitch knitting patterns if you’re inspired to knit more garter stitch now. 
«
»

Have you read?

Play with Texture and Embroidery in this Intarsia Knit Shawl

This is a project that kind of stopped me in my tracks when I saw it while scrolling Ravelry. It’s such a fun contrast of a semisolid color worked in stockinette stitch and a more tonal yarn worked in a feather and fan variation. 

(See more about feather and fan in this post on my blog; I also have a feather and fan scarf if you want to practice.)

The Nitty Wrap from Renate Dziedataja is worked in fingering weight yarn from a Finnish mill, and the name is the Finnish word for meadow. You of course can use whatever yarn you have handy.

It’s even more interesting because the project is worked from one short end across to make a long rectangle, and the two different sections are joined using intarsia. Generally we think of intarsia as being used for colorwork, so this is a fun different use of it. The lace section is charted in the pattern but it’s pretty easy to follow. 

And of course it’s totally optional but to add a little more interest and tie the two colors of yarn together the designer also added some embroidery along the short edges on the stockinette side. A drawing of what she did is included but you can also add different designs if you’d rather. 

The shawl has I-cord edgings to give it a nice finished look that doesn’t take away from the organic simplicity of the design. 

As shown, the shawl measures about 22.5 inches/57 cm wide and 59 inches/150 cm long. You can of course adjust this according to your preference, the amount of yarn you have and the gauge you are getting. Try a thicker yarn to make a wider shawl if you like. 

This pattern is available in English and Latvian for free on Ravelry. 

Photo: Renate Dziedataja 

Categories

baby hat Baby Patterns Beginner Book Reviews cardigan Christmas CraftGossip Giveaways Craft News and Events Free Knitting Patterns Giveaways! Hats Knitting Articles Of Interest Knitting Patterns Knitting Technique & Ideas mittens Quick scarf shawl patterns socks Sweaters

RSS More Articles

  • Is It Safe To Make My Own Soap? Beginner Soap Making Safety Guide
  • How To Clean Up And Restore A Vintage Singer Sewing Machine Table
  • 7 Homemade Fabric Stiffeners For Crafts: Natural, Washable And Budget-Friendly Options
  • How To Sew A Curved Hem Without Puckers, Twists Or Tears
  • Ice Cream Crafts for Kids to Make
  • Easy Crochet Projects That Start With A Magic Loop
  • Chicken Coasters To Crochet For Farmhouse Kitchens, Easter Tables And Handmade Gifts
  • Red Panda Crochet Patterns For Cute Woodland Amigurumi Projects
  • Can You Take Knitting Needles On A Plane? Carry-On Rules For Traveling Knitters
  • How to Make a Tri-Fold Castle Card

Pick Your Blog

  • Sewing
  • Knitting
  • Quilting
  • Crochet
  • Home & Garden
  • Recycled Crafts
  • Scrapbooking
  • Card Making
  • Polymer Clay
  • Cross-Stitch
  • Edible Crafts
  • Felting
  • Glass Art
  • Indie Crafts
  • Kids Crafts
  • Jewelry Making
  • Lesson Plans
  • Needlework
  • Bath & Body
  • Party Ideas
  • Candle Making
  • DIY Weddings
  • Not Craft
  • Free Craft Projects

Copyright © 2026 · CraftGossip | Start Here | Contact Us | Link to Us | Your Editors | Privacy and affiliate policy