• Home
  • Suggest A Craft
  • DIY Newsletter

Knitting

Patterns, projects and techniques

  • About CraftGossip
  • Our Network
    • Bath & Body Crafts
    • Candle Making Ideas
    • Crochet Ideas
    • Cross Stitch
    • Edible Crafts
    • Felting Patterns
    • Glass Art
    • Home & Garden Ideas
    • Indie Crafts
    • Jewelry Making
    • Kids Crafts
    • Knitting Patterns
    • Lesson Plans
    • Needlework
    • Party Ideas
    • Polymer Clay
    • Quilting Ideas
    • Recycled Crafts
    • Scrapbooking
    • Sewing Patterns
    • Card Making
    • DIY Weddings
    • Not Craft Ideas
  • Giveaways
  • Roundups
  • Store
  • Search

Ways to Join New Yarn without Weaving in Ends

January 25, 2024 by Sarah White

Lots of knitters hate weaving in yarn ends, so it’s popular to wonder if there are ways to join in new yarn that don’t involve having to weave in ends when the knitting is done. Here’s a quick look at three of the most popular options and how to do them.

>> Do you know about A New Yarn That Protects Your Products From Odor, Bacteria, and Allergens! <<

First, you can tie the yarn ends together using a knot that’s known in the yarn world as the magic knot. It’s super strong, easy to do, and theoretically you can tie it, trim the yarn ends super close to the knot and never worry about it again. I usually leave a little bit of a tail when I do this just in case, but I don’t think I’ve ever had a knot come undone when I did it properly.

This is the way to make a magic ball, where you take all your tiny yarn leftovers and join them together to knit with. Knotions has a tutorial for how to do it.

If you’re working with wool or other natural, feltable fibers, my favorite way to join a new ball of yarn is what’s known as the felted join (or, if you want to be more dramatic, spit splicing, since you can do it with saliva instead of water). Basically you separate out the plies a little bit on the end of the new yarn and the old yarn, add a little water and rub the ends together between your hands until they sort of felt together.

I’m working on an intarsia vest right now that has about 20 different balls of yarn across the width of it and the only way I can handle it is by working with a piece of yarn about as long as my arms and using the felted join to make it back into a continuous strand. If you want to know how to do this, check out the tutorial at Brooklyn Tweed.

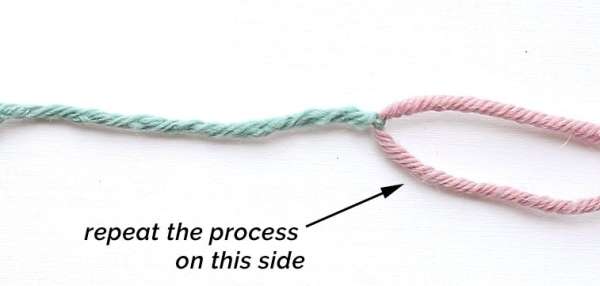
Another good option is known as the Russian join, which has the benefit of being able to be used on any kind of fiber. You need a yarn needle to work it, but once you know how it’s pretty quick and easy to do. Sheep and Stitch has a good photo tutorial of how this one works.

Of course if you’re working a sweater or a hat or something with an inside, you can sometimes just leave your tail ends hanging and not worry about it.

What do you do when you join new yarn? Do you like weaving in ends? I’d love to hear your thoughts!

[Photo: Sheep and Stitch]

An Easy Way to Weave in Yarn Tails as You Knit

Great Ways to Weave in Ends

Next Pattern:

  • Knit a Shawl Inspired by Maori Weaving
  • Loose Ends Helps Finish Unfinished Projects
  • Join Me to Make Upcycled Yarn
«
»

Have you read?

Knit a Linen Stitch Hot Pad

Linen stitch is one of my favorite knitting stitch patterns that, every time I use it in a project, I think about how I don’t use it often enough. 

It’s an easy stitch to make, with slip stitches done with the yarn held to the front of the work on the right/front side and to the back on the wrong/back side, which makes the strand of yarn a visible part of the pattern. 

It also makes a fabric that is thick and looks kind of like a woven fabric.

I recently used linen stitch to make a double-thick pot holder, which I worked in a kind of interesting way. I didn’t want to have to do any sewing on the project, so I started it from a crochet cast on and picked up stitches from the side of the cast on to make the hot pad all in one piece in the round with the edge sealed. 

This requires working on two circular needles, which is another technique I don’t use that often and am always reminded how much I like it when I do. 

The combination of double thickness and the stitch pattern makes for a hot pad that’s already pretty thick, but I also added a bit of old towel to the inside before I closed up the end to make it super thick and extra protective for your surfaces. 

I found the engineering challenge of this construction method to be a lot of fun, but you could also just knit it as a tube (casting on twice as many stitches as I did) and sew up the ends by hand when the knitting is done. Either way you’ve got a useful and pretty addition to your kitchen, whether you work it in a solid color, stripes or as a stash busting project will all your cotton odd balls. 

You can grab the pattern over at Our Daily Craft, or check it out on Ravelry. 

40+ Hot Pads You Can Sew For The Kitchen [Sewing]

A Cozy Knit to Calm Your Mind

Double Knit an Infinity Scarf

Categories

baby hat Baby Patterns Beginner Book Reviews cardigan Christmas CraftGossip Giveaways Craft News and Events Free Kntting Patterns Giveaways! Hats Knitting Articles Of Interest Knitting Patterns Knitting Technique & Ideas mittens Quick scarf shawl patterns socks Sweaters

RSS More Articles

  • Etsy Spotlight – Sew the Dress of Your Dreams with This Romantic Puff Sleeve Pattern
  • Vacation Pocket Mini Album Project
  • DIY Soda Bottle Cloches – A Clever Way to Shield Your Seedlings
  • Crochet Pattern Review: Aura Pullover
  • Scrappy Pineapple Block – Quilt Pattern
  • Learning about the Moon for Kids
  • Free Crochet Pattern – Battenberg Blanket
  • Book Review – Big Thrift Energy
  • How to Make a Summer Drinks Shaker Card
  • Cookie Monster Toddler Apron

Copyright © 2025 · CraftGossip | Start Here | Contact Us | Link to Us | Your Editors | Privacy and affiliate policy