• Home
  • Suggest A DIY
  • DIY Newsletter

Knitting

Free Patterns, Tutorials and Project Ideas

  • About CraftGossip
  • Our Network
    • Bath & Body Crafts
    • Candle Making Ideas
    • Crochet Ideas
    • Cross Stitch
    • Edible Crafts
    • Felting Patterns
    • Glass Art
    • Home & Garden Ideas
    • Indie Crafts
    • Jewelry Making
    • Kids Crafts
    • Knitting Patterns
    • Lesson Plans
    • Needlework
    • Party Ideas
    • Polymer Clay
    • Quilting Ideas
    • Recycled Crafts
    • Scrapbooking
    • Sewing Patterns
    • Card Making
    • DIY Weddings
    • Not Craft Ideas
  • Giveaways
  • Roundups
  • Store
  • Search

Would You Like this Microwavable Pain Relief Ball?

June 19, 2017 by Sarah White

good medicine microwavable ball

Judith M. is the winner.

I am having such trouble explaining what this is. I don’t think the brand exists anymore, but I want to say it was called a Good Medicine Ball. I reviewed it years ago and never really use it, so I thought it was time to send it on to someone else who might.

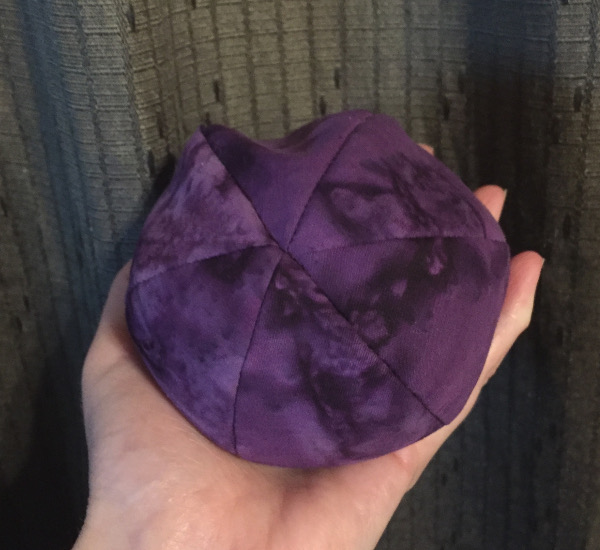
What it is is a fabric ball filled with some kind of fine material (it’s not rice or poly beads, I’m not sure what it is but I think it’s scented, too) that you can heat up in the microwave and hold in your hands for relief from the pain of too much knitting or other aches and pains in your hands.

Or if your hands are always cold like mine are, this might be just the thing to warm and soothe them a bit as well.

If you’d like a chance to win this ball, leave a comment on this post before the end of the day Sunday, June 25. I’d love to know if you have any tips for cutting down on pain from knitting. I just know I need to stretch a lot and take a lot of breaks, but I don’t always follow my own advice!

Thanks for visiting, commenting and sharing, and good luck!

Save

Next Pattern:

  • Knit a Swirly Square in Any Size You Like
  • Book Review - Knit Like a Latvian: 50 Knitting…
  • Knit a Scrubby Shaped Like a Witch Hat
«
»

Comments

  1. Carla Hundley says

    June 19, 2017 at 12:28 pm

    Love the color of this
    medicine ball! Sounds
    like it would be a great
    help.
    Carla from Utah

  2. tangles64 says

    June 19, 2017 at 1:13 pm

    I would love to have this, I have found that my wrists and fingers hurt during and after I knit. I guess it’s because of cutting hair for 17 yrs ????.

    I love knitting and this would be great to soothe the pain away.

    Thank you for the opportunity to win this.

    Pam Hayes

  3. yolanda v says

    June 19, 2017 at 4:03 pm

    I usually take project breaks. If I’m knitting, then I work on a crochet project, and visa versa. It seems to help. But I
    mostly power through the pain if it’s not too bad.. 🙂

  4. Pauline Stewart says

    June 19, 2017 at 5:02 pm

    i have a long sausage shaped one of those called a wheaty bag. its brilliant for helping soothe my fibromyalgia pain! but because its full of wheat and i zap it in the microwave i do tend to whiff like porridge lol!!

  5. Chris Lopez says

    June 19, 2017 at 8:55 pm

    I’m so bad about breaks and stretching. Sometimes I just soak my hands in hot water and that helps.

  6. dorideas says

    June 20, 2017 at 5:32 am

    Make sure you put a cup of water with it in the microwave when heating up to prevent the contents burning! I have one with wheat and one with rice.

  7. Robin D says

    June 20, 2017 at 6:14 am

    I would love to have this. I had surgery on my elbow. That would be perfect for the elbow.

  8. Mary Sue Owens says

    June 20, 2017 at 8:21 am

    I went through physical rehab for 6 weeks after a long intense several months of knitting and crocheting. The repeated small movements had caused pain all the way up to my shoulder. Now I am careful to stretch, stop and do “push ups” against the wall, anything that has larger movements to counteract the smaller movements. This would be great to have to put on the shoulder while doing the smaller movements. :>)

  9. Olga says

    June 20, 2017 at 8:34 am

    I too am guilty of not taking enough breaks. this would make a nice little reminder to take breaks if it sat next to me while I worked,

  10. darlene says

    June 20, 2017 at 9:31 am

    hi sarah I made a knitted pair of mitts but eliminated the top so it was open. I knitted pockets on the top side of the hand with little flaps and a button closure. then I sewed 2 pouches to go inside the pockets. I fill them with cherry pits which hold the heat very well plus I threw in some lavender. it works great for me and I hope it works for you.

  11. Suzie Quebedeaux says

    June 20, 2017 at 9:34 am

    I usually realize after I am hurting that I need to stretch. I never think to do it before starting a project.

  12. A McColl says

    June 20, 2017 at 10:09 am

    My children are boys. We had thousands of what we call bouncy balls around the house when they were growing up, small very hard round rubber balls. On a table, I roll my hand, particularly the thumb area, over them. Feels great and helps my hand pain alot. This was not my original thought. I found it on a knitter site a while back.

    I would love the pain relief ball for my mother.
    She has debilitating arthritis and we are always looking for new pain relief ideas. Looks hand made?

  13. Linda G says

    June 20, 2017 at 10:28 am

    I would actually like this for my back!!!

  14. Judith Marsh says

    June 20, 2017 at 10:33 am

    Sounds wonderful! Maybe it has buckwheat and or lavender in it!

  15. Deborah Jankowski says

    June 20, 2017 at 11:25 am

    Oh! It would be wonderful to get some nice relief with a gadget like this after a few hours of intense crocheting or knitting! Please pick me!

  16. Cindy says

    June 20, 2017 at 11:28 am

    I’m at an age where something is always hurting. A pain relief ball would be nice to have on hand.

  17. Joanne wilkinson says

    June 20, 2017 at 11:40 am

    Weeding, crafting, quilting takes its toll on our hands. This would be heavenly relief! Thank you for this kind offer.

  18. Cindy S says

    June 20, 2017 at 1:31 pm

    Ironically, I was just thinking this morning I need 10 heating pads so I can put them on all my joints!

  19. Francesca Garcia says

    June 20, 2017 at 5:01 pm

    I would love to win this ball. My hands hurt after working with wire for jewelry making. Using pliers and hammers take their toll on my hands, wrists and arms.

  20. Denise Dennison says

    June 20, 2017 at 8:38 pm

    I would love to have one of these for my cold and achy hands! They are always cold and ache when I crochet and play with polymer clay.

    Thanks so much for the opportunity to win one!
    Denise Dennison

  21. Minta Fung says

    June 20, 2017 at 11:23 pm

    Several years ago I was crocheting while my grandson was bouncing those small 1 inch bouncy balls. They are made of really hard rubber and bounce pretty high but to the point they bounced into my lap and I started rolling 2 of them around in my hands. To my surprise some of the stiffness and aching went away. So now that is what I use to help with the pain. They are really cheap to buy, only a few bucks for a back of 4.

  22. Jeanette says

    June 21, 2017 at 1:09 am

    This sounds wonderful! I have RA but am an avid knitter. My mom taught me when I was 6. I’d love to MAKE one!

  23. lindarumsey says

    June 21, 2017 at 3:55 am

    When my hands start to ache a bit from knitting I switch to crochet or cross stitch and the different movements seem to help ease any pain.

  24. Joyce Brown says

    June 23, 2017 at 10:13 pm

    Love the purple! I squeeze soft, squishy balls at regular intervals. These balls are big, thick balloons filled with dry flour! I also will spread Vicks VapoRub or some sort of Capsacian creme on my hands that gives some refief…

  25. Mary Sternberg says

    June 24, 2017 at 6:54 am

    I’ve seen something similar for wrapping around your neck, but it’s too cumbersome for sore hands. What a great idea for stiff fingers. I can even envision tucking it between the sheets to warm my cold feet!

Have you read?

How To Do Kitchener Stitch: A Beginner-Friendly Guide To Grafting Knitting Seamlessly

Kitchener stitch is one of those knitting techniques that feels a little bit mysterious until you finally sit down and do it. It is often used to close the toes of socks, but it is also a wonderfully neat way to join two sets of live stitches together without making a bulky seam.

If you have ever finished a beautiful sock and then paused at the toe because the pattern says “graft remaining stitches,” this is the tutorial you want to keep handy.

Kitchener stitch, also called grafting, creates a row of stitches between two pieces of knitting so the join looks almost invisible. Instead of binding off and sewing two edges together, you use a tapestry needle and yarn to form a new row of knitting between the live stitches.

It is one of the most useful finishing techniques for knitters, especially if you enjoy knitting socks, mittens, cowls, loop scarves, or garments where a smooth join matters.

You might also like this older CraftGossip post on grafting with Kitchener stitch, and if you want to go deeper into finishing techniques, this post on mastering grafting in knitting is another helpful read.

What Is Kitchener Stitch?

Kitchener stitch is a method of grafting two sets of live stitches together. The stitches stay on two needles, usually held parallel to each other, and you use a threaded tapestry needle to work through the stitches in a specific order.

When done well, the finished join looks like one continuous piece of knitting.

This is why Kitchener stitch is so popular for:

  • sock toes
  • mitten tips
  • shoulder joins
  • cowls
  • loop scarves
  • seamless tube projects
  • underarm stitches on some sweaters
  • small knitted bags and pouches

It is most commonly used on stockinette stitch, but grafting can also be adapted for other stitch patterns once you understand the basic idea.

Why Use Kitchener Stitch Instead Of Sewing A Seam?

The biggest benefit of Kitchener stitch is that it creates a smooth, almost invisible join. That matters most in places where you do not want a bulky seam, such as the toe of a sock.

A sewn seam across a sock toe can feel uncomfortable inside a shoe. Kitchener stitch avoids that by creating a flat, flexible finish.

It also gives knitted items a more polished look. If you are making gifts, charity knits, socks, or heirloom-style projects, learning this one technique can make your finished pieces look much neater.

For knitters who enjoy socks, you may also like this roundup of knitting patterns using sock yarn, especially if you have leftover yarn after finishing a pair.

Supplies You Need

To work Kitchener stitch, you will need:

  • two knitting needles holding live stitches
  • a tapestry needle or darning needle
  • yarn tail or matching yarn
  • scissors
  • good lighting
  • a little patience the first time

If you are working sock toes, most patterns will tell you how many stitches to leave on each needle before grafting.

As a general guide, leave a yarn tail at least three times the width of the stitches you are grafting. If you are unsure, leave a little extra. It is much easier to weave in a longer tail than to run out halfway across.

A blunt-tip tapestry needle is easier to control than a sharp sewing needle because it slides between yarn strands without splitting them as much. You can find tapestry needles, sock knitting tools, stitch markers, and finishing supplies through places such as Amazon, Mary Maxim, or your favorite local yarn store.

Before You Start: Set Up Your Stitches

For standard Kitchener stitch on stockinette:

Hold the two needles parallel, with the wrong sides of the knitting facing each other.

The right side of the knitting should be facing out.

The needle closest to you is the front needle.

The needle farther away from you is the back needle.

Thread your yarn tail onto a tapestry needle.

Try to keep the stitches sitting neatly on the needles and avoid twisting them before you begin.

The Kitchener Stitch Mantra

Many knitters remember Kitchener stitch with this little rhythm:

Front needle: knit off, purl on.
Back needle: purl off, knit on.

That means:

On the front needle, go into the first stitch knitwise and take it off. Then go into the next stitch purlwise and leave it on.

On the back needle, go into the first stitch purlwise and take it off. Then go into the next stitch knitwise and leave it on.

Once you get into the rhythm, it becomes much less intimidating.

Kitchener Stitch Step-By-Step

Setup Step 1

Insert the tapestry needle into the first stitch on the front needle as if to purl.

Pull the yarn through.

Leave the stitch on the knitting needle.

Setup Step 2

Insert the tapestry needle into the first stitch on the back needle as if to knit.

Pull the yarn through.

Leave the stitch on the knitting needle.

Now you are ready to begin the repeating sequence.

Step 1: Front Needle, Knitwise, Off

Insert the tapestry needle into the first stitch on the front needle as if to knit.

Pull the yarn through.

Slip that stitch off the knitting needle.

Step 2: Front Needle, Purlwise, On

Insert the tapestry needle into the next stitch on the front needle as if to purl.

Pull the yarn through.

Leave that stitch on the knitting needle.

Step 3: Back Needle, Purlwise, Off

Insert the tapestry needle into the first stitch on the back needle as if to purl.

Pull the yarn through.

Slip that stitch off the knitting needle.

Step 4: Back Needle, Knitwise, On

Insert the tapestry needle into the next stitch on the back needle as if to knit.

Pull the yarn through.

Leave that stitch on the knitting needle.

Repeat these four steps until all stitches have been grafted.

A Simple Way To Remember It

Say this out loud as you work:

Knit off, purl on.
Purl off, knit on.

It feels silly the first few times, but it works. Many knitters mutter this little phrase while closing sock toes, and honestly, anything that helps you avoid losing your place is worth doing.

How Tight Should Kitchener Stitch Be?

One of the most common mistakes with Kitchener stitch is pulling the yarn too tightly.

You are not sewing a seam closed. You are creating a new row of knitting.

After every few stitches, gently adjust the tension so the grafted row matches the surrounding stitches. If you pull too tightly, the join may pucker. If you leave it too loose, the grafted row may look stretched out.

A good trick is to look at the stitches beside the graft and try to match their size.

Do not panic if it looks a little uneven while it is still on the needles. Kitchener stitch often looks better once everything is off the needles and the tension has been gently adjusted.

How To Finish The Last Stitches

When you get to the final stitches, continue the sequence as closely as possible.

If there is only one stitch left on a needle, work the “off” part of the sequence for that stitch.

Pull the yarn through gently and then weave the tail into the inside or wrong side of the project.

For socks, weave the end into the inside of the toe so it will not be visible.

Troubleshooting Kitchener Stitch

My graft looks too tight

You probably pulled the yarn too firmly as you worked. Use the tip of your tapestry needle to gently loosen each grafted stitch, working from one side to the other.

My graft looks loose

Gently snug up the grafted stitches one at a time. Do not yank the working yarn all at once, as this can make one area tight and another loose.

I lost my place

Pause and look at the stitches. If the last stitch was removed from the front needle, you are probably ready to work the “purl on” part on the front needle or move to the back needle. If you are a beginner, it helps to say the mantra out loud every single time.

I split the yarn

A blunt tapestry needle helps prevent splitting. If a stitch looks split and messy, carefully undo that part before continuing.

The join looks like a seam, not a row of knitting

This usually means the tension is too tight or the needle was inserted in the wrong direction on some stitches. Practice on a swatch before using Kitchener stitch on a special project.

Practice Before Grafting A Real Project

If Kitchener stitch makes you nervous, knit two small stockinette swatches and place the live stitches on two needles. Use a contrasting yarn to practice grafting across the stitches.

Practicing with a different color makes it easier to see what the grafted row is doing. Once you understand the movement, try again with matching yarn.

This is especially useful before grafting handmade socks, because sock toes are small and can feel fiddly the first few times.

When Else Can You Use Kitchener Stitch?

Kitchener stitch is most famous for sock toes, but it is helpful in many other knitting projects.

Use it for joining the ends of a cowl or loop scarf, especially when you start with a provisional cast on. This CraftGossip post on making loop scarves from stash yarn mentions using a provisional cast on so the ends can be grafted together neatly.

You can also use Kitchener stitch for small bags, seamless headbands, mitten tips, and some garment joins.

If you are brushing up on knitting basics, this post on favorite ways to cast on is a good companion read, especially if you are learning how different beginnings and endings affect the finish of a project.

Kitchener Stitch For Sock Knitters

If you knit socks from the cuff down, Kitchener stitch is one of the most useful finishing techniques you can learn.

Most cuff-down sock patterns end with a small number of stitches divided between two needles. Kitchener stitch closes those stitches without creating a ridge across the toe.

For a comfortable sock toe:

Keep the stitches evenly divided.

Do not pull the graft too tightly.

Check that the toe lies flat before weaving in the end.

Use matching yarn whenever possible.

Once the sock is finished, blocking can also help smooth the stitches and even out the graft.

If you enjoy knitting small accessories, you might also like these easy headband knitting patterns, which are great projects for practicing finishing techniques on something smaller than a sweater.

Kitchener stitch has a reputation for being tricky, but it is really just a short sequence repeated across two needles. Once you remember the rhythm — knit off, purl on, purl off, knit on — it becomes much easier.

The real secret is to slow down, keep your tension relaxed, and remember that you are creating a row of knitting, not stitching a seam shut.

It may not feel natural the first time, but after a few sock toes or practice swatches, Kitchener stitch becomes one of those finishing skills you will be glad to have in your knitting toolkit.

Categories

baby hat Baby Patterns Beginner Book Reviews cardigan Christmas CraftGossip Giveaways Craft News and Events Free Knitting Patterns Giveaways! Hats Knitting Articles Of Interest Knitting Patterns Knitting Technique & Ideas mittens Quick scarf shawl patterns socks Sweaters

Featured Posts

mittens inspired by literature

Knit Mitts Inspired by Lit

red heart sashay scarf

Knit a Quick Ruffle Scarf with Tutorial Help

The Bojagi Shawl is a Great Knit Gift Option

Protect Your Crown with this Silk-Lined Hat Knitting Pattern

Knit a hair turban for after shower or swimming.

Knit a Hair Turban to Wear after Shower or Swimming

RSS More Articles

  • Cross Stitch Ice Cream and Frozen Treats
  • 15 Charity Sewing Projects That Let You Sew Something Useful For A Good Cause
  • Sunflower Ribbon Embroidery Tutorials and Kits to Brighten Your Hoop
  • Decorating Mistakes That Make Your Living Room Feel Cluttered
  • Remembering Jill Smokler, Founder Of Scary Mommy
  • In the Garden Layer Cake – A Bloom-Filled Fabric Collection for Spring Sewing
  • How To Do Kitchener Stitch: A Beginner-Friendly Guide To Grafting Knitting Seamlessly
  • Pattern Review: Georgie Granny Square Bucket Hat Crochet Pattern
  • 12 Handmade Patriotic 4th of July Card Ideas
  • Shark Week Learning for Kids

Pick Your Blog

  • Sewing
  • Knitting
  • Quilting
  • Crochet
  • Home & Garden
  • Recycled Crafts
  • Scrapbooking
  • Card Making
  • Polymer Clay
  • Cross-Stitch
  • Edible Crafts
  • Felting
  • Glass Art
  • Indie Crafts
  • Kids Crafts
  • Jewelry Making
  • Lesson Plans
  • Needlework
  • Bath & Body
  • Party Ideas
  • Candle Making
  • DIY Weddings
  • Not Craft
  • Free Craft Projects

Copyright © 2026 · CraftGossip | Start Here | Contact Us | Link to Us | Your Editors | Privacy and affiliate policy