• Home
  • Suggest A DIY
  • DIY Newsletter

Knitting

Free Patterns, Tutorials and Project Ideas

  • About CraftGossip
  • Our Network
    • Bath & Body Crafts
    • Candle Making Ideas
    • Crochet Ideas
    • Cross Stitch
    • Edible Crafts
    • Felting Patterns
    • Glass Art
    • Home & Garden Ideas
    • Indie Crafts
    • Jewelry Making
    • Kids Crafts
    • Knitting Patterns
    • Lesson Plans
    • Needlework
    • Party Ideas
    • Polymer Clay
    • Quilting Ideas
    • Recycled Crafts
    • Scrapbooking
    • Sewing Patterns
    • Card Making
    • DIY Weddings
    • Not Craft Ideas
  • Giveaways
  • Roundups
  • Store
  • Search

Get Some Great Free Patterns for Charity Knitting

July 3, 2015 by Sarah White

helping hands ebook
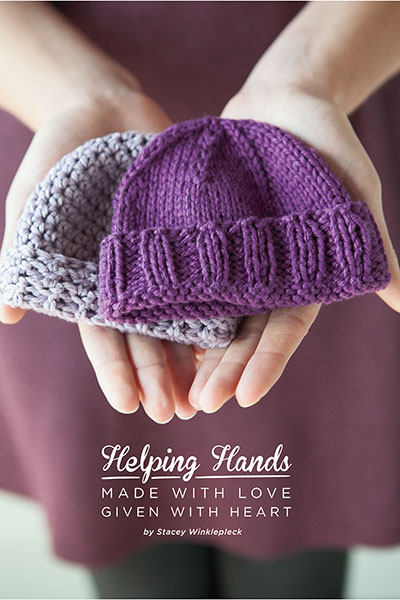
Knit Picks has released a great little ebook for charity knitting (and crochet) that includes six projects for each craft that are perfect to make and donate to the charity of your choice. The Helping Hands ebook is a free PDF download and includes the following knitting patterns:

  • Calming baby knit hat
  • Comfort knit pet blanket
  • Kitty-corner knit square
  • Rainbow knit blankie
  • PICC armband (to cover the line coming out of the arm)
  • Benefaction knit hat

I think my favorite is the rainbow blankie, a pretty chevron pattern sure to bring comfort to whoever needs it.

The patterns are considered appropriate for intermediate knitters and all are designed by Stacey Winklepleck.

Do you knit for charity? I’d love to hear what you make and where you give it.

Did you know, specific to knitters, you can join our Knitting Patterns Only group to get knitting patterns, ask questions and gain inspiration for what to knit next. Or how about our VIP Knitting Group with Free knitting pattern access including vintage and Etsy designer patterns for less than $1 a month.

[Photo via Knit Picks.]
Check out our New DIY Crafty Creative T-shirts featuring Knitting and Yarn Designs.

Next Pattern:

  • Download Yarnspirations Patterns to Help Charity
  • Get Some Texture with the Pass the Honey Knitting Pattern
  • Get Great Texture with the Ropes and Twines Cardigan…
«
»

Comments

  1. Mary Allen says

    July 3, 2015 at 11:30 am

    I will love knitting these, thank you.

  2. Dot says

    July 3, 2015 at 2:43 pm

    I knit black wool caps for the troops in the Middle East, and send them to The Ships Project:

    http://www.theshipsproject.com/Home.htm

    She’s been sending knit items and cool-ties to sailors and ground troops since 2001, and is about 500 items away from reaching a total of 600,000 items sent!

  3. Angelina says

    July 4, 2015 at 11:15 am

    Very great keep it up checking it out on facebook Thx!

  4. sdridgerider says

    July 18, 2015 at 4:47 pm

    I knit for Heavenly Angels In Need. Preemie items, I also make Memory Boxes.

  5. Margaret says

    October 20, 2015 at 2:37 pm

    I make hats for Syrian refugees and blankets for the Humane Society and squares for Knit a Square for South African orphans. Thank you for the patterns!

  6. Jeanné Fox says

    January 3, 2016 at 12:27 pm

    I knit jumpers for oil-soaked penguins; blankets & knee robes to raise funds for a hospice; and a variety of nests for orphaned / injured wildlife rescue centres.

  7. mequilter says

    January 8, 2016 at 9:07 pm

    I knit hats for a couple of the local hospitals. Mostly newborn size, and small child size. When I finish up the ones on my needles, I’ll be bringing in the bag of 100 next week. That’ll bring the total up to 400. Surprisingly, I still have yarn left, lol.

  8. Deanna Porter says

    February 24, 2016 at 6:56 pm

    All of these wonderful people doing wonderful things has inspired this knitter to do the same! Pay it forward…?? warms my heart….Deanna Porter…

  9. Sylvia Stephenson says

    February 29, 2016 at 9:16 pm

    I knit hats for newborn, for my local hospital. Also, hats, mittens and socks for RSVP in my area.

  10. M.E Walters says

    June 20, 2016 at 11:14 am

    I think you all are wonderful and God Bless your will and hands to keep it up.

  11. cynthia says

    July 2, 2016 at 9:29 am

    Crochet hats for our homeless.

  12. morghanlafay says

    July 6, 2016 at 1:55 pm

    Me, my sister and mom 81 btw she got Alzheimer’s but still knit. We knit for old age home so they can sell in their shop we support 11 old people who don’t have the funds. Knit blankets beanies baby clothes.I also knit for 5 schools scarfs, beanies and gloves.

  13. RONNI says

    July 31, 2016 at 6:29 pm

    I knit for children in The Gambia.mostly up to 6 months old. Sometimes up to 1 year. I often knit premature items forfor the very tiny babies

  14. michele normandin says

    September 8, 2016 at 8:44 pm

    Try holysews.org. they make burial wraps,knit hats, for still horns and babies that are too small for burial clothes. I knit hats 3″. So rewarding. God bless the little ones????

  15. Chris R. says

    May 3, 2017 at 1:05 am

    30 of us charity knit every Monday. Our local YMCA is kind enough to set up tables in their lovely atrium. All yarn is donated. We donated over 1,100 items in 2016. Items stay in our community. We donate to three wonderful “charities- our local NEAR food shelf, a very large church, and the Y. We knit baby items for the church who provide needy baby showers, hats scarves mittens and earwarmers headbands. The Y distrib to school nurses.we laugh, we bond, we help each other and have formed lasting friendships. We have croheters too and teach anyone who wants to learn. We range from 10 to 90 years old. There is a special place in heaven for charity knitters and cricketers.

  16. Laura says

    July 10, 2017 at 8:21 pm

    I knit for Hats For The Homeless in Minneapolis. Hats4thehomeless.blogspot.com/ I use the pattern Classic World War II Watch Cap.

  17. Dorothy says

    July 26, 2018 at 2:14 pm

    I would love to make prem clothes for Chris Hani Baragwanath Hospital NICU

Have you read?

How To Do Kitchener Stitch: A Beginner-Friendly Guide To Grafting Knitting Seamlessly

Kitchener stitch is one of those knitting techniques that feels a little bit mysterious until you finally sit down and do it. It is often used to close the toes of socks, but it is also a wonderfully neat way to join two sets of live stitches together without making a bulky seam.

If you have ever finished a beautiful sock and then paused at the toe because the pattern says “graft remaining stitches,” this is the tutorial you want to keep handy.

Kitchener stitch, also called grafting, creates a row of stitches between two pieces of knitting so the join looks almost invisible. Instead of binding off and sewing two edges together, you use a tapestry needle and yarn to form a new row of knitting between the live stitches.

It is one of the most useful finishing techniques for knitters, especially if you enjoy knitting socks, mittens, cowls, loop scarves, or garments where a smooth join matters.

You might also like this older CraftGossip post on grafting with Kitchener stitch, and if you want to go deeper into finishing techniques, this post on mastering grafting in knitting is another helpful read.

What Is Kitchener Stitch?

Kitchener stitch is a method of grafting two sets of live stitches together. The stitches stay on two needles, usually held parallel to each other, and you use a threaded tapestry needle to work through the stitches in a specific order.

When done well, the finished join looks like one continuous piece of knitting.

This is why Kitchener stitch is so popular for:

  • sock toes
  • mitten tips
  • shoulder joins
  • cowls
  • loop scarves
  • seamless tube projects
  • underarm stitches on some sweaters
  • small knitted bags and pouches

It is most commonly used on stockinette stitch, but grafting can also be adapted for other stitch patterns once you understand the basic idea.

Why Use Kitchener Stitch Instead Of Sewing A Seam?

The biggest benefit of Kitchener stitch is that it creates a smooth, almost invisible join. That matters most in places where you do not want a bulky seam, such as the toe of a sock.

A sewn seam across a sock toe can feel uncomfortable inside a shoe. Kitchener stitch avoids that by creating a flat, flexible finish.

It also gives knitted items a more polished look. If you are making gifts, charity knits, socks, or heirloom-style projects, learning this one technique can make your finished pieces look much neater.

For knitters who enjoy socks, you may also like this roundup of knitting patterns using sock yarn, especially if you have leftover yarn after finishing a pair.

Supplies You Need

To work Kitchener stitch, you will need:

  • two knitting needles holding live stitches
  • a tapestry needle or darning needle
  • yarn tail or matching yarn
  • scissors
  • good lighting
  • a little patience the first time

If you are working sock toes, most patterns will tell you how many stitches to leave on each needle before grafting.

As a general guide, leave a yarn tail at least three times the width of the stitches you are grafting. If you are unsure, leave a little extra. It is much easier to weave in a longer tail than to run out halfway across.

A blunt-tip tapestry needle is easier to control than a sharp sewing needle because it slides between yarn strands without splitting them as much. You can find tapestry needles, sock knitting tools, stitch markers, and finishing supplies through places such as Amazon, Mary Maxim, or your favorite local yarn store.

Before You Start: Set Up Your Stitches

For standard Kitchener stitch on stockinette:

Hold the two needles parallel, with the wrong sides of the knitting facing each other.

The right side of the knitting should be facing out.

The needle closest to you is the front needle.

The needle farther away from you is the back needle.

Thread your yarn tail onto a tapestry needle.

Try to keep the stitches sitting neatly on the needles and avoid twisting them before you begin.

The Kitchener Stitch Mantra

Many knitters remember Kitchener stitch with this little rhythm:

Front needle: knit off, purl on.
Back needle: purl off, knit on.

That means:

On the front needle, go into the first stitch knitwise and take it off. Then go into the next stitch purlwise and leave it on.

On the back needle, go into the first stitch purlwise and take it off. Then go into the next stitch knitwise and leave it on.

Once you get into the rhythm, it becomes much less intimidating.

Kitchener Stitch Step-By-Step

Setup Step 1

Insert the tapestry needle into the first stitch on the front needle as if to purl.

Pull the yarn through.

Leave the stitch on the knitting needle.

Setup Step 2

Insert the tapestry needle into the first stitch on the back needle as if to knit.

Pull the yarn through.

Leave the stitch on the knitting needle.

Now you are ready to begin the repeating sequence.

Step 1: Front Needle, Knitwise, Off

Insert the tapestry needle into the first stitch on the front needle as if to knit.

Pull the yarn through.

Slip that stitch off the knitting needle.

Step 2: Front Needle, Purlwise, On

Insert the tapestry needle into the next stitch on the front needle as if to purl.

Pull the yarn through.

Leave that stitch on the knitting needle.

Step 3: Back Needle, Purlwise, Off

Insert the tapestry needle into the first stitch on the back needle as if to purl.

Pull the yarn through.

Slip that stitch off the knitting needle.

Step 4: Back Needle, Knitwise, On

Insert the tapestry needle into the next stitch on the back needle as if to knit.

Pull the yarn through.

Leave that stitch on the knitting needle.

Repeat these four steps until all stitches have been grafted.

A Simple Way To Remember It

Say this out loud as you work:

Knit off, purl on.
Purl off, knit on.

It feels silly the first few times, but it works. Many knitters mutter this little phrase while closing sock toes, and honestly, anything that helps you avoid losing your place is worth doing.

How Tight Should Kitchener Stitch Be?

One of the most common mistakes with Kitchener stitch is pulling the yarn too tightly.

You are not sewing a seam closed. You are creating a new row of knitting.

After every few stitches, gently adjust the tension so the grafted row matches the surrounding stitches. If you pull too tightly, the join may pucker. If you leave it too loose, the grafted row may look stretched out.

A good trick is to look at the stitches beside the graft and try to match their size.

Do not panic if it looks a little uneven while it is still on the needles. Kitchener stitch often looks better once everything is off the needles and the tension has been gently adjusted.

How To Finish The Last Stitches

When you get to the final stitches, continue the sequence as closely as possible.

If there is only one stitch left on a needle, work the “off” part of the sequence for that stitch.

Pull the yarn through gently and then weave the tail into the inside or wrong side of the project.

For socks, weave the end into the inside of the toe so it will not be visible.

Troubleshooting Kitchener Stitch

My graft looks too tight

You probably pulled the yarn too firmly as you worked. Use the tip of your tapestry needle to gently loosen each grafted stitch, working from one side to the other.

My graft looks loose

Gently snug up the grafted stitches one at a time. Do not yank the working yarn all at once, as this can make one area tight and another loose.

I lost my place

Pause and look at the stitches. If the last stitch was removed from the front needle, you are probably ready to work the “purl on” part on the front needle or move to the back needle. If you are a beginner, it helps to say the mantra out loud every single time.

I split the yarn

A blunt tapestry needle helps prevent splitting. If a stitch looks split and messy, carefully undo that part before continuing.

The join looks like a seam, not a row of knitting

This usually means the tension is too tight or the needle was inserted in the wrong direction on some stitches. Practice on a swatch before using Kitchener stitch on a special project.

Practice Before Grafting A Real Project

If Kitchener stitch makes you nervous, knit two small stockinette swatches and place the live stitches on two needles. Use a contrasting yarn to practice grafting across the stitches.

Practicing with a different color makes it easier to see what the grafted row is doing. Once you understand the movement, try again with matching yarn.

This is especially useful before grafting handmade socks, because sock toes are small and can feel fiddly the first few times.

When Else Can You Use Kitchener Stitch?

Kitchener stitch is most famous for sock toes, but it is helpful in many other knitting projects.

Use it for joining the ends of a cowl or loop scarf, especially when you start with a provisional cast on. This CraftGossip post on making loop scarves from stash yarn mentions using a provisional cast on so the ends can be grafted together neatly.

You can also use Kitchener stitch for small bags, seamless headbands, mitten tips, and some garment joins.

If you are brushing up on knitting basics, this post on favorite ways to cast on is a good companion read, especially if you are learning how different beginnings and endings affect the finish of a project.

Kitchener Stitch For Sock Knitters

If you knit socks from the cuff down, Kitchener stitch is one of the most useful finishing techniques you can learn.

Most cuff-down sock patterns end with a small number of stitches divided between two needles. Kitchener stitch closes those stitches without creating a ridge across the toe.

For a comfortable sock toe:

Keep the stitches evenly divided.

Do not pull the graft too tightly.

Check that the toe lies flat before weaving in the end.

Use matching yarn whenever possible.

Once the sock is finished, blocking can also help smooth the stitches and even out the graft.

If you enjoy knitting small accessories, you might also like these easy headband knitting patterns, which are great projects for practicing finishing techniques on something smaller than a sweater.

Kitchener stitch has a reputation for being tricky, but it is really just a short sequence repeated across two needles. Once you remember the rhythm — knit off, purl on, purl off, knit on — it becomes much easier.

The real secret is to slow down, keep your tension relaxed, and remember that you are creating a row of knitting, not stitching a seam shut.

It may not feel natural the first time, but after a few sock toes or practice swatches, Kitchener stitch becomes one of those finishing skills you will be glad to have in your knitting toolkit.

Categories

baby hat Baby Patterns Beginner Book Reviews cardigan Christmas CraftGossip Giveaways Craft News and Events Free Knitting Patterns Giveaways! Hats Knitting Articles Of Interest Knitting Patterns Knitting Technique & Ideas mittens Quick scarf shawl patterns socks Sweaters

Featured Posts

One Ball Knits – Book Review

Knitting from your Stash

Giveaway! From Berroco

Knitted Easter Bunny Pattern

safarian knit scarf

Make a Stash-Busting Scarf, or One that Looks Like It

RSS More Articles

  • Cross Stitch Ice Cream and Frozen Treats
  • 15 Charity Sewing Projects That Let You Sew Something Useful For A Good Cause
  • Sunflower Ribbon Embroidery Tutorials and Kits to Brighten Your Hoop
  • Decorating Mistakes That Make Your Living Room Feel Cluttered
  • Remembering Jill Smokler, Founder Of Scary Mommy
  • In the Garden Layer Cake – A Bloom-Filled Fabric Collection for Spring Sewing
  • How To Do Kitchener Stitch: A Beginner-Friendly Guide To Grafting Knitting Seamlessly
  • Pattern Review: Georgie Granny Square Bucket Hat Crochet Pattern
  • 12 Handmade Patriotic 4th of July Card Ideas
  • Shark Week Learning for Kids

Pick Your Blog

  • Sewing
  • Knitting
  • Quilting
  • Crochet
  • Home & Garden
  • Recycled Crafts
  • Scrapbooking
  • Card Making
  • Polymer Clay
  • Cross-Stitch
  • Edible Crafts
  • Felting
  • Glass Art
  • Indie Crafts
  • Kids Crafts
  • Jewelry Making
  • Lesson Plans
  • Needlework
  • Bath & Body
  • Party Ideas
  • Candle Making
  • DIY Weddings
  • Not Craft
  • Free Craft Projects

Copyright © 2026 · CraftGossip | Start Here | Contact Us | Link to Us | Your Editors | Privacy and affiliate policy